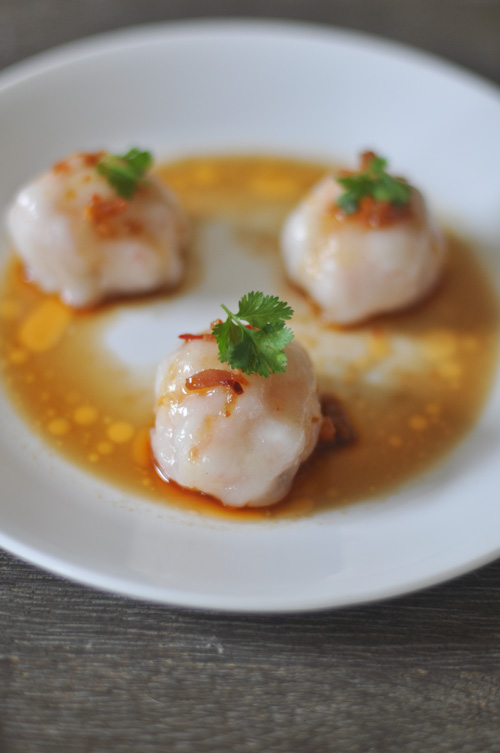
Prawn and Scallop Dumplings
A few years ago I attended an eight week career development session with a group of very talented and ambitious ladies from work. There was a lot of coaching on how to communicate effectively and change your approach depending on who you were talking to and self-confidence building exercises (One of them was that we had to come up with a one or two liner for when we came face to face with the company’s CEO in the elevator – which never actually happened!).
In one of the final sessions we were asked to reflect on our goals and aspirations for the rest of the year and we all went around the room to share. Some of the ladies talked about aspiring for a promotion within a few months, other talked about how they had been so focussed on their career for the last few years that they wanted to make sure they also had time for their families. The lady beside me had her turn come up and she said she wanted to get healthy and lose 5 kilos… My turn was up and I said that my goal was that I would like to make a transition in to doing a different role at work, given I had been doing the same thing for a few years already.
That’s what I said…
In reality – I was thinking about how I wish my fingers were nimble enough to pleat dumplings like the har gao you could find in the dim sum restaurants. Yes, my definition of success was to be a dim sum master!
A few months later, I moved companies, and moved roles and in career terms, I’ve never looked back…
Occasionally, (like last weekend) I’ll make an attempt at perfecting the pleats – but they never turn out right. Instead, I settled for making little dumpling balls filled with prawns and scallops. The filling (yum!) more than made up for the lack of pleating skills and the dough still came out translucent and delicious.
Alas, my dream to be a dim sum master seems to be more elusive than ever.
Prawn and Scallop Dumplings
For the dough
- 150 grams wheat starch
- 85 grams tapioca flour
- pinch of salt
- 265 ml boiling water
- 10 g lard or shortening
- In a bowl mix the wheat starch, tapioca flour and salt together. Slowly add the boiling water and then the lard. Using a pair of chopsticks, mix the dough until you form a ball of dough. Place the dough on your work space and start to knead (careful as it will be very warm). Knead for around 10 to 15 minutes. The dough will also be quite sticky, so you can use a pasta scrapper to help remove the dough from your work surface. Cut it into four equal pieces and place these in a plastic sandwich bag to rest.
- Take one of the pieces and roll it into a log around 20 cm long. Cut this into 8 equal parts place the pieces, except for the one you are going to work with back into the sandwhich bag.
- Get two sheets of plastic (you can use another sandwich bag, cut in half for it, alternatively, use two pieces of baking paper) and lightly oil the bags. Put the piece of dough in the middle of the two bags (or baking paper) and press down on the dough with the palm of your hand to flatten. Then take a rolling pin and roll out the dough until around 5 cm in diameter. Alternatively, use a tortilla wrapper to flatten the dough.
- Place a spoonful of the prawn and scallop mixture in the middle of the dough then pinch the ends together to seal and so you form a little dumpling ball.
For the prawn and scallop filling
- 150 grams raw scallops, chopped
- 250 grams peeled, deveined
- 30 grams bamboo shoots, finely chopped
- 1 1/2 tablespoons tapioca starch
- 1 egg white
- 2 teaspoons oyster sauce
- 1 teaspoon sugar
- 2 tablespoons spring onions, white part only, chopped
- 1 teaspoon sesame oil plus more for serving
- XO Sauce to serve
- pinch of salt and white pepper to taste
- Finely chop the scallop and prawns and place in a bowl with the bamboo shoots, tapioca starch, egg white, oyster sauce, sugar, spring onions, sesame oil and salt and pepper.
- Using your hands, mix the scallop and prawn mixture well and cover with some cling wrap. Allow to marinate at least an hour in the refrigerator.
- Use the prawn mixture as per instructions above.
- Steam the dumplings for six minutes over high heat.
- Serve immediately with a mixture of XO Sauce, soy sauce, and a dash of sesame oil.


")
")

")


