Feeds:
Posts
Comments

Posts Tagged ‘chinese food’

Pam's Fresh Lumpia

Pam’s Fresh Lumpia

I met Pam over a year ago when I held a macaron class to raise money for the victims of Typhoon Haiyan. She signed up for the class and we got along straight away (it helped when I found out she worked in the food industry!). When the class ended, everyone left, but Pam and Kath stayed for lunch and that was the start of our friendship. Today, Pam is not only a great friend to me, but she is equally close to my siblings. She has an open invitation to all our family gatherings.

I learned this recipe from Pam. It comes from her Ama (grandmother). If I remember correctly, her Ama used to make this and another dish, Misua noodles, whenever it was someone’s birthday in their family. Then her Ama would personally deliver the food to each family. What a lovely tradition! One night Pam made this and the Misua for our family. It wasn’t anyone’s birthday but the amount of work she put in to the two dishes made all of us feel like it was!

I could eat this every day. Actually, that is a fact. There was a period where I must have eaten this for dinner two straight weeks – sometimes lunch and dinner. This is one of those dishes that tastes so good and is so filling that you don’t miss the fact that there is no meat! Two things I’ve changed – I’ve omitted the fresh lumpia/spring roll wrappers but you could easily purchase this from the frozen section of your grocery. I also omitted the sweet garlic sauce that you pour over the spring rolls. This recipe makes a lot – enough for at least 6 people. It also keeps well so great to make ahead.

Ama’s Lumpia

  • 50 ml vegetable oil
  • 2 onions, sliced
  • 3 garlic cloves
  • 2 tablespoons chicken powder
  • 4 large carrots, peeled and grated
  • 1/2 head of cabbage, sliced
  • 300 grams green beans, diced into 1 cm pieces
  • 500 grams firm tofu, drained and diced into 1 to 2 cm pieces
  • 200 grams crushed peanuts
  • 2 teaspoons sugar
  • 1 teaspoon salt
  • Coriander leaves for garnish
  • Optional: Cut nori sheets for garnish
  • Fresh lettuce leaves to serve
  1. In a large pot, heat the oil and add the onion, saute until translucent. Add the garlic and chicken powder (for seasoning)and cook for two to three minutes.
  2. Add the grated carrots and cook until wilted, around 5 to 7 minutes on medium heat. Add the cabbage and continue to cook until the cabbage is slightly wilted, around 10 minutes. At this stage, you will notice a lot of liquid seeping out of the vegetables. Add the green beans continue to cook around 5 more minutes. You are looking for the beans to soften but retain some bite.
  3. Finally, add the tofu and mix into the vegetables and cook for another two to three minutes. (Optional step:Pam drained the vegetable/tofu filling before assembly.)
  4. Make the crushed peanut mixture by processing the peanuts, sugar and salt in a food processor for a few seconds
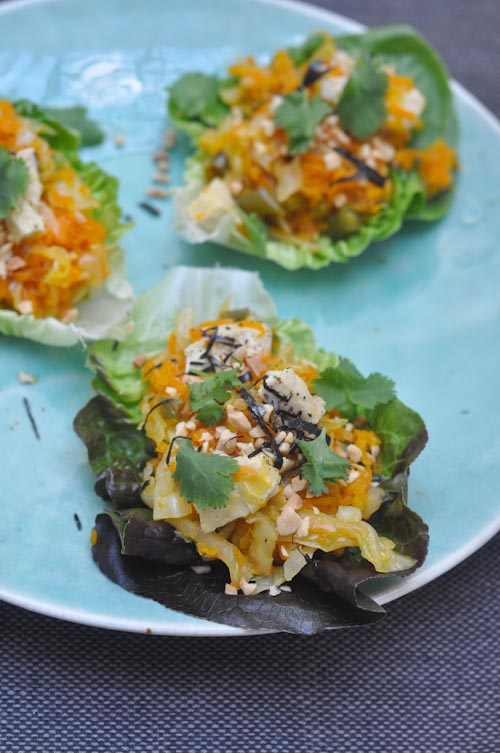
  5. To serve, place a heaping spoon on to the lettuce leaves, add the crushed peanut mixture, top with coriander and nori.

Read Full Post »

Roast Duck with Mandarin Pancakes

Roast Duck with Mandarin Pancakes

Tucked away in the Gateway Building on the corner of Pitt and Alfred Streets is Neptune Palace.  “Neppi’s” is somewhat of an institution in the banking and finance circles. In typical Malaysian/Chinese restaurant fashion, the menu is extensive with at least 140 items to choose from.   Having said that, there are a number of requisite dishes that we always order like the “Rusty Motorbike”, Seafood Sang Choy Bau, Kapitan Chicken and the Duck Pancakes.  These are the reliable dishes that people come back for over and over again in the almost twenty years that this restaurant has been in operation.

Post the roast chicken he made the other day, we decided to try and re-create a few of our favourite dishes from this restaurant.  We liked the way they served their Duck Pancakes.  Whilst most Chinese restaurants will serve mostly the skin and very little meat, Neppi’s is a little different in that there is a generous amount of fried duck meat and of course, a decent amount of crispy skin.  I actually prefer the Mandarin Pancakes this way.  Rather than purchasing a whole duck, it made more sense for us to buy two duck breasts for this recipe.

So we marinated the duck breasts overnight in a teaspoon of five spice powder, two tablespoons of maple syrup and two tablespoons of soy sauce.  Then we sous vide the duck breasts at 57c for an hour and finally pan fried skin side down to get it all nice and extra crispy.  In the meantime, we prepared the Mandarin Pancakes (recipe below).  My husband is proving to be a better cook that I imagined!

To serve, we sliced up some of the duck, whilst the rest, we diced and fried it a little bit more.

The dishes we order at Neppi’s remind me sometimes of the very good friends I have.  There are over 140 dishes in the Neppi’s menu but we keep coming back to the dishes we know we can trust.  Similarly, of all the many friends I have, there are only a handful that I know I can rely on, no matter what.

Roast Duck with Mandarin Pancakes

Roast Duck with Mandarin Pancakes

Mandarin Pancakes

Recipe adapted from Neil Perry’s Rockpool

  • 400 grams plain flour
  • 190 ml boiling water
  • pinch salt
  • 65 ml cold water
  • sesame oil for rolling
  1. Place the flour, water and salt in a bowl of a stand mixer and using a dough hook, turn on to medium speed until the dough comes together in a ball.
  2. Remove the dough from the bowl and knead lightly on a lightly oiled surface for around 5 minutes until the ball of dough is smooth and springs back when pressed.
  3. Place the dough back in the bowl and cover with a damp cloth towel and allow to rest for 30 minutes.
  4. When the dough has rested, place it back on a lightly oiled surface and cut the dough in half. Keep one covered with a damp cloth and roll the other half into a long sausage. Cut the dough into 10 equal pieces.
  5. Press each piece down with the palm of your hand and then brush each piece with sesame oil. Place one piece of dough on top of the other so that the oiled sides are facing each other and then roll each pair of pancakes out to a diameter of 10 cm. Repeat with the rest of a pieces. Now, do the same with the rest of the dough. Place the rolled pieces of dough on top of each other in a plate and cover with a damp cloth.
  6. Heat a frying pan over medium heat. Place the pancake in the pan and dry fry for around 20 to 30 seconds or until you can see faint brown spots start to appear. You will also notice the dough puff up as it cooks.
  7. Flip the pancakes to the other side to cook again, another 15 to 20 seconds.
  8. Remove the pancakes from the heat and carefully pull them apart after a minute or so (allowing the pancakes to cool down a bit).
  9. The pancakes can be stored on a plate covered with a damp cloth before serving. They can also be stored in the freezer and heated in a warm oven before serving.
  10. To assemble, lay a pancake on a plate, spread over with hoisin sauce, sliced of green onions and cucumbers.

Read Full Post »

Chinese Style Braised Peanuts

Chinese Style (Fragrant) Braised Peanuts

Is January really almost gone?  I really thought that things would slow down after the Christmas holidays but oh how wrong I was!  With the new job, days have gone by in a blur. Most of the time I’m meeting new people, learning new systems, products and before I know it, it’s past seven or eight in the evening.  At times my head’s just spinning with so much new information that I long for the day when everything “just clicks”… The good news though, as nerdy as it sounds, is that I’m enjoying it all.  I feel lucky to be where I am now.

Then there’s my other project.   In between work, I’ve also been getting our house ready for auction.  We had it painted and did a little bit of cleaning and styling, and by the time it was done, I was almost regretting leaving.   In fact, the photographer said it was the most photogenic house he had seen in a long while.

So really, there isn’t much time for anything else.  Blogging has continued to take a backseat for the moment, especially, as I mentioned before, being able to visit some of my favourite blogs.  Even the recipes now that appeal to me, are the ones that require minimal effort on my part.

Take these Chinese Style, also known and Fragrant Braised Peanuts, I made the other day, which also coincides quite nicely with Chinese New Year just around the corner.  The inspiration for them came during one  yum cha lunch with my family where I polished off the braised peanuts that came with the roast duck and soy chicken.  As I nibbled on them I thought they tasted like they had been cooked in a traditional Chinese red braising liquid and that there probably wasn’t much to making them.  Sure enough, this tasty snack takes nothing more than placing all ingredients in a pot and allowing to simmer for a few hours.  Peanuts braised in soy, star anise, cassia, garlic, chillies, sugar and hints of citrus, the result is a myriad of lovely and addicting flavours.

Chinese Style Braised Peanuts

Chinese Style (Fragrant) Braised Peanuts

Chinese Style Braised Peanuts

  • 750 grams raw peanuts
  • 3 star anise
  • 2 cinnamon sticks or cassia barks
  • 2 dried orange peel pieces (or 1 fresh orange peel)
  • 5 cloves garlic, peeled
  • 3 dried chillies
  • 50 grams rock sugar or caster sugar
  • 4 tablespoons light soy sauce
  • 2 tablespoons dark soy sauce
  • 2 teaspoons five spice powder
  1. Combine all ingredients in a large pot with eight cups of water. Bring to a boil and then turn the heat down so that the braising liquid is just simmering. Add some water while cooking if necessary (I added around two cups each hour I boiled the peanuts). Cook for around two and a half hours.
  2. Remove the peanuts from the heat and place in another container. Allow the peanuts to cool before storing in the refrigerator.
Chinese Style Braised Peanuts

Chinese Style Braised Peanuts

Read Full Post »