Feeds:
Posts
Comments

Posts Tagged ‘nuts’

Life Changing Cracker

A few days ago I stumbled across a recipe for “Life Changing Bread”. Again, normally I would be skeptical about such a bold statement but given that I had recently made a bold statement of my own, I gave this recipe the benefit of the doubt. So off I went to the health food store to buy ingredients I had never ever heard of (psyllium, flax seed, chia) and $15 later (this was going to be one expensive loaf of bread!) I was ready to bake.

Essentially you mix all the dry ingredients together and bind it with a combination of water, maple syrup and coconut oil. Then you let the bread sit, and then bake for 20 minutes, turn the loaf over and bake for another 40 minutes, then let rest until cool. Was it good? Yes. Was it Life Changing? I’ll have to be honest and say not really. I found the texture to be a little bit… slimy.

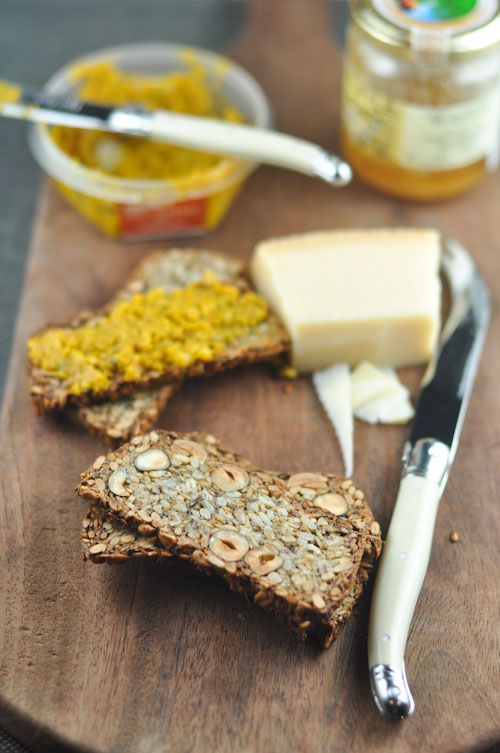
Now I normally don’t like eating the edges in a loaf of bread, but I found the edges of this loaf to be particularly yummy – nutty and crispy. So why not slice the rest of the loaf and bake it again to get dry out the dough like a biscotti? So I sliced the rest of the loaf in to thin slices and baked at 175 c for 20 minutes.

Success! This time, the crackers were amazing, on it’s own, topped with pumpkin and cashew spread, topped with cheese and truffle honey etc. The crackers were delicious!
It was only after that I realized that blogger who posted this recipe also had a recipe for Life Changing Crackers on her blog. The technique is different though, it that she spreads the mixture in between two sheets of baking paper and rolls in to a thin sheet.

Whichever way you decide to make the crackers (baking it a third time like I did, or rolling it out in to thin sheets), this is a winner recipe… and dare I agree? Life Changing!

Life Changing Cracker topped with pumpkin and cashew dip

Life Changing Cracker topped with pumpkin and cashew dip

Read Full Post »

Chocolate Covered Almonds

Chocolate Covered Almonds

I have never understood the art of tempering chocolate. It’s one of those things that has been explained to me, that I’ve read up on, watched videos etc but I still don’t understand the science behind it. When someone starts to clarify the process, I can feel my eyes glaze over and even if I nod my head and say all the right things (i.e. “ah so that’s why!” “oh, now I get it!”), I’m still as confused as ever.

One thing I do know, is that if you don’t temper chocolate, you don’t get that beautiful shine and nice crisp…. which is why I love this recipe, because you can cover up the fact that you don’t know how to temper chocolate properly and still make something pretty damn impressive!

I like to serve these chocolates with coffee or tea. I usually coat them in cocoa powder but have also coated them previously in a combination of cocoa and orange zest.

Chocolate Covered Almonds

Chocolate Covered Almonds

Chocolate Covered Almonds

  • 50 grams water
  • 150 grams sugar
  • 500 grams blanched almonds
  • 25 grams butter
  • 350 grams dark good quality chocolate, chopped evenly
  1. Lightly oil your kitchen bench top with a neutral oil like grapeseed.
  2. Place the water and sugar in a heavy based saucepan. Heat until 110c then add the almonds and coat with the syrup.
  3. Take the almonds off the heat and stir vigorously so as to separate the almonds into pieces. Then, place the almonds back on to the heat and continue to stir over a low heat until the almonds are caramelized, around 15 minutes
  4. To test if the almonds are done, take a piece and cut in the middle and see whether the inside of the almond is a nice golden colour.
  5. When done, add the butter and stir through the almonds. Remove from the heat and place on your kitchen bench top. Using two forks, separate the pieces of almonds carefully so they don’t stick to each other.
  6. Allow the almonds to cool then proceed to coating with chocolate.
  7. First temper the chocolate. Take around 2/3 of the chocolate pieces and place in the microwave. Heat in 20 second intervals until the chocolate has almost all melted, making sure to stir the mixture every now and then (especially if your microwave heats unevenly) and then add the rest of the chocolate and let the heat from the chocolate melt the remaining chocolate, and ensuring to stir constantly.
  8. Once the chocolate has reached around 31c, pour 1/3 of the chocolate in to the almonds and stir vigorously again, with the goal of separating the almonds into pieces (try not to have too many clusters of chocolate almonds).
  9. Place the bowl in the fridge and allow to cool for 5 minutes. Now, add another 1/3 of the chocolate (if it gets cool, you can again microwave for around 10 seconds or so before adding this to the refrigerated almonds.
  10. Once again, mix the chocolate vigorously, aiming to keep the almonds separated. Place the almonds back in the fridge for another 5 minutes.
  11. For the last time, pour the remaining chocolate and stir to keep the almonds apart. Place the almonds in the fridge to set for 5 minutes.
  12. If the almonds have stuck together, carefully separate them.
  13. To finish, dust the chocolates in cocoa powder.

Read Full Post »

Best Ever Granola

Best Ever Granola

There’s a granola movement happening in our family nowadays – we can’t get enough of it. It started innocently enough. I had been wanting to try the granola recipe from Daniel Humm’s Eleven Madison restaurant ever since I saw an interview where he said that he loved to run every morning and made his own granola. He thought it was a great idea to give a jar of granola to each person who dined at his restaurant. Apparently, his granola is legendary. I think… mine is better. I know it’s a big and bold statement but the beauty of this recipe is that you can adapt it to your taste.

The way I look at it, the basic recipe is made up of rolled oats, brown sugar, maple syrup and olive oil – from there you’re free to add whatever else you like. The original recipe calls for pepitas and dried sour cherries. I substituted macadamias and dried blueberries instead. My husband prefers his with almonds and pecans. My sister adds dried mangoes… See? I told you there was a granola movement in the family! Everyone has their own recipe which they claim is the best version. We can’t agree on which version is best. We can’t even agree on when and how to eat it. I like it for breakfast with milk. My sister likes it as a snack with yogurt. Her husband takes his with skim milk and my husband treats it more like a snack.

I’m sure as a family which version, when to eat it and what to eat the granola with will be one of those things that we will never come to terms with. But I’d still encourage you to try this recipe (or a version of it) and share it with your families as well.

Best Ever Granola

Best Ever Granola

Best Ever Granola

Adapted from Daniel Humm, Eleven Madison

  • 2 1/2 cups rolled oats
  • 1 cup dried coconut chips (or dried shredded coconut)
  • 1 cup raw macadamias
  • 1 cup pistachios
  • 1/2 cup brown sugar
  • 1/3 cup maple syrup
  • 1/3 cup extra virgin olive oil
  • 1 teaspoon salt
  • 3/4 cup dried blueberries
  • Note: For the macadamias and pistachios – feel free to substitute nuts of your choice (i.e. almonds, pecans, pepitas etc)
  • Note: For the dried blueberries – feel free to substitute dried fruit of your choice
  1. Mix the rolled oats, coconut chips and nuts in a large bowl.
  2. In a saucepan, heat the brown sugar, maple syrup and olive oil until the sugar has melted, around 2 to 3 minutes.
  3. Remove the brown sugar/maple syrup from the heat and add the salt. Pour this over the rolled oats mixture and mix until well combined.
  4. Line a baking sheet with parchment paper and spread the granola over it. Bake in a pre-heated 150c oven for 30 to 40 minutes until golden and the mixture has dried. Stir the granola once or twice while baking.
  5. When done baking, add the dried blueberries. Allow to cool and store.

Read Full Post »

Chinese Style Braised Peanuts

Chinese Style (Fragrant) Braised Peanuts

Is January really almost gone?  I really thought that things would slow down after the Christmas holidays but oh how wrong I was!  With the new job, days have gone by in a blur. Most of the time I’m meeting new people, learning new systems, products and before I know it, it’s past seven or eight in the evening.  At times my head’s just spinning with so much new information that I long for the day when everything “just clicks”… The good news though, as nerdy as it sounds, is that I’m enjoying it all.  I feel lucky to be where I am now.

Then there’s my other project.   In between work, I’ve also been getting our house ready for auction.  We had it painted and did a little bit of cleaning and styling, and by the time it was done, I was almost regretting leaving.   In fact, the photographer said it was the most photogenic house he had seen in a long while.

So really, there isn’t much time for anything else.  Blogging has continued to take a backseat for the moment, especially, as I mentioned before, being able to visit some of my favourite blogs.  Even the recipes now that appeal to me, are the ones that require minimal effort on my part.

Take these Chinese Style, also known and Fragrant Braised Peanuts, I made the other day, which also coincides quite nicely with Chinese New Year just around the corner.  The inspiration for them came during one  yum cha lunch with my family where I polished off the braised peanuts that came with the roast duck and soy chicken.  As I nibbled on them I thought they tasted like they had been cooked in a traditional Chinese red braising liquid and that there probably wasn’t much to making them.  Sure enough, this tasty snack takes nothing more than placing all ingredients in a pot and allowing to simmer for a few hours.  Peanuts braised in soy, star anise, cassia, garlic, chillies, sugar and hints of citrus, the result is a myriad of lovely and addicting flavours.

Chinese Style Braised Peanuts

Chinese Style (Fragrant) Braised Peanuts

Chinese Style Braised Peanuts

  • 750 grams raw peanuts
  • 3 star anise
  • 2 cinnamon sticks or cassia barks
  • 2 dried orange peel pieces (or 1 fresh orange peel)
  • 5 cloves garlic, peeled
  • 3 dried chillies
  • 50 grams rock sugar or caster sugar
  • 4 tablespoons light soy sauce
  • 2 tablespoons dark soy sauce
  • 2 teaspoons five spice powder
  1. Combine all ingredients in a large pot with eight cups of water. Bring to a boil and then turn the heat down so that the braising liquid is just simmering. Add some water while cooking if necessary (I added around two cups each hour I boiled the peanuts). Cook for around two and a half hours.
  2. Remove the peanuts from the heat and place in another container. Allow the peanuts to cool before storing in the refrigerator.
Chinese Style Braised Peanuts

Chinese Style Braised Peanuts

Read Full Post »