Feeds:
Posts
Comments

Posts Tagged ‘david chang’

Pash rides the ferry

Pash rides the ferry

Momofuku Milk Bar Pistachio Cake

Fear is not in the vocabulary of my seven month old puppy, Pash.  That is, until last weekend when, for the first time, we took her on a ferry ride.  As we queued to ride the ferry, you could see the anxiety in her eyes and hesitation in her steps.  “Come on Pash, let’s go!” I told her impatiently – there were a number of people behind us but she refused to move.  Trembling with her tail between her legs she finally inched forward behind my older, more confident dog, Baci.

I could relate.  There aren’t many things that faze me in the kitchen.   While I can appreciate simple home cooked meals, I like the challenge of making more complicated dishes.  The more steps and techniques, the more interesting for me.  It keeps me occupied.

The exception to this would be anything from Christina Tosi’s Milk Bar Cookbook,  especially her layered cakes which feature enough recipes within recipes to strike fear in your heart.  Every time I had a look at the cookbook I promised myself that I would try any one of the layered cakes but the minute I started reading a recipe, the heart would start racing and I’d break out in a cold sweat.

But hey, if Pash could get on that ferry – maybe I could attempt to make one of her cakes?

Pistachio Cake, Lemon Curd, Milk Crumbs

Pistachio Cake, Lemon Curd, Milk Crumbs

So here’s my attempt at facing my fear of layered cakes….  A total of four recipes – pistachio cake, lemon curb, milk crumbs and pistachio frosting is definitely not for the faint hearted.

In the end I had to make my own pistachio paste and half way through my durable thermomix refused to grind any further and there was a horrifying error message.   I had to give it a rest for the night.  I started early the next morning and several times during the day I asked myself whether I had taken on more than I could chew.  More than 12 hours later, my kitchen looked like a war zone and I was exhausted.

But let me tell you, that cake… was worth it!

Pistachio Cake, Lemon Curd, Milk Crumbs

Pistachio Cake, Lemon Curd, Milk Crumbs

Momofuku Milk Bar Pistachio Layer Cake

Makes 1 (6-inch) Layer Cake, 5 to 6 inches tall; Serves 6 to 8

  • 1 Recipe Pistachio Cake
  • 65 grams Pistachio Oil
  • 1 Recipe Lemon Curd
  • 1/2 Recipe Milk Crumb
  • 1 Recipe Pistachio Frosting

You will also need 1 (6 inch) cake ring and 2 strips acetate, each 3 inches wide and 20 inches long.
Note: Grapeseed oil can be substituted for the pistachio oil, but part of the toasted pistachio depth of flavour will be lost.

  1. Put a piece of parchment on the counter. Invert the cake onto it and peel off the parchment from the bottom of the cake. Use the cake ring to stamp out 2 circles from the cake, these are your top 2 cake layers. The remaining cake “scrap” will come together to make the bottom layer of the cake.
  2. For the first layer, clean the cake ring and place it in the center of the sheet pan lined with clean parchment. Use 1 strip of acetate to line the inside of the cake ring. Put the cake scraps inside the ring and use the back of your hand to tamp the scraps together into a flat even layer. Dunk a pastry brush in the pistachio oil and give the layer of cake a good healthy bath of half of the oil. Use the back of the spoon to spread half of the lemon curd in an even layer over the cake. Sprinkle one-third of the milk crumbs evenly over the lemon curd. Use the back of your hand to anchor them in place. Use the back of a spoon to spread one third of the pistachio frosting as evenly as possible.
  3. For layer two, with your index finger, gently tuck the second strip of acetate between the cake ring and the top 1/4 inch of the first strip of acetate, so that you have a clear ring of acetate 5 to 6 inches tall – high enough to support the height of the finished cake. Set a cake round on top of the frosting, and repeat the process for layer 1 (if 1 of your 2 cake rounds is jankier than the other, use it here in the middle and save the prettier one for the top).
  4. For layer three, nestle the remaining cake round into the frosting. Cover the top of the cake with the remaining frosting. Give it volume and swirls, or you can opt for a perfectly flat top. Garnish the frosting with the remaining milk crumbs.
  5. Transfer the sheet pan to the freezer and freeze for a minimum of 12 hours to set the cake and filling. The cake will keep in the freezer for up to 2 weeks.
  6. At least 3 hours before you are ready to serve the cake, pull the sheet pan out of the freezer and, using your fingers and thumbs, pop the cake out of the cake ring. Gently peel off the acetate, and transfer the cake to a platter or cake stand. Let it defrost in the fridge for a minimum of 3 hours (wrapped well in plastic, the cake cake be refrigerated for up to 5 days). Slice the cake and serve.
Pash takes a ferry ride

Pash takes a ferry ride

Pistachio Cake

Makes 1 quarter sheet pan cake

  • 190 grams pistachio paste
  • 75 grams glucose
  • 6 egg whites
  • 280 grams confectioners’/icing sugar
  • 110 grams almond meal/flour
  • 75 grams pistachio oil (can use grapeseed as a substitute)
  • 55 grams heavy cream
  • 160 grams flour
  • 6 grams baking powder
  • 6 grams kosher salkt
  1. Heat the oven to 175 c. Combine the pistachio paste and glucose in the bowl of a stand mixer fitted with a paddle attachment and beat on medium low for 2 to 3 minutes, until the mixture turns into a sticky green paste. Scrape down the sides of the bowl with a spatula.
  2. On low speed, add the egg whites one at a time, being careful not to add the next egg white until the previous one is completely incorporated. Stop the mixer and scrape down the sides of the bowl with a spatula after every 2 to 3 egg whites.
  3. Add the icing/confectioners’ sugar and almond meal and, on low speed, paddle them in for 2 to 3 minutes, until the mixture thickens. Stop the mixer and scrape down the sides of the bowl. Stream in the pistachio oil and heavy cream and paddle on low speed for 1 minute. Stop the mixer and scrape down the sides of the bowl.
  4. Add the flour, baking powder, and salt and paddle on low for 2 to 3 minutes, until the batter is super smooth.
  5. Spray a quarter sheet pan and line it with parchment paper. Using a spatula, spread the cake batter in an even layer in the pan. Bake for 20 to 22 minutes. At 20 minutes, gently poke the edge of the cake with your finger; the cake should bounce back and it should be slightly golden brown on the sides and pulling away from the sides of the pan ever so slightly. Leave the cake in the oven for an extra 1 to 2 minutes if it doesn’t pass these tests.
  6. Take the cake out of the oven and cool on a wire rack or in a pinch, in the fridge or freezer, wrapped in plastic wrap for up to 5 days.

Lemon Curd

  • 3 lemons
  • 100 grams sugar
  • 4 eggs
  • 1 gelatin sheet
  • 115 grams butter, very cold
  • 2 grams salt
  1. Zest the lemons. Put the sugar, lemon zest and 80 grams of lemon juice in a blender and blend until the sugar granules have dissolved. Add the eggs and blend on low until you have a bright yellow mixture. Transfer the contents to a medium pot or sauce pan. Clean the blender canister.
  2. Bloom the gelatin by placing this sheet in a bowl with cold water for a few minutes to soften.
  3. Heat the lemon mixture over low heat, whisking regularly. As it heats up, it will begin to thicken; keep a close eye on it. Once it boils, remove it from the stove and transfer it to the blender. Add the bloomed gelatin, butter, and salt and blend until the mixture is thick, shiny and super smooth.
  4. Pour the mixture through a fine mesh sieve into a heat proof container and put in the fridge until the lemon curd has cooled completely, at least 30 minutes. This can be refrigerated for up to 1 week.

Pistachio Frosting

  • 115 grams butter, at room temperature
  • 40 grams icing/confectioners’ sugar
  • 230 grams pistachio paste
  • 2 grams kosher salt
  1. Combine the butter and sugar in the bowl of a stand mixer fitted with a paddle attachment and cream together on medium high for 2 to 3 minutes, until fluffy and pale yellow.
  2. Add the pistachio paste and salt and mix on low speed for half a minute, then kick up the speed to medium high for 2 minutes. Scrape down the sides of the bowl.
  3. Use the frosting immediately, or store it in an airtight container for up to one week.

Milk Crumbs
Recipe can be found here.

Read Full Post »

Momofuku Crispy Pork Buns

Momofuku Crispy Pork Buns

Picasso once said:

“I paint the way some people write their autobiography. The paintings, finished or not, are the pages from my diary…”

Now, replace paint with “cook” in the first sentence and replace paintings with “dishes” in the second and you’ll understand why.   My blog is pretty much a chronicle of my life.  Many posts are prompted by an event, memory or story that’s happened to me.  To many people, reading these stories would be similar to what I heard a little boy saying over and over again at the Picasso exhibit I went to today…. “boring, boring, boring…”, but to me, these are the moments worth savouring.

Take, for example, these Momofuku style pork buns.  When I think Momofuku Pork Buns, I remember my last trip to New York where my husband and I had a Momofuku Day and hit all four of his restaurants in one day.  I remember the time I took my Mom to the new Momofuku Seibo in Sydney and the expression on her face when they brought over the slow-cooked pork shoulder for “dessert” (priceless comes to mind!).  Then there was New Year’s dinner with my husband, where, the Seibo chefs, when they found out that I did not drink, decided to create a “juice menu” for me (why didn’t anyone else think of that before? From now on juice menus should be mandatory at all restaurants!).

In this version, I thought I’d try something a little bit different and deep fry the pork belly upon the counsel of a few foodie friends.  The pork belly is prepared Filipino Style.  First, simmered with salt, bay leaves, garlic and onion, then deep fried over a low heat.  Right before serving, the pork belly is fried again at a higher heat – there is something truly magical when you’re left with the most tender pork belly and super crispy skin.

So anyway, here it is – Momofuku Pork Buns with twice fried crispy pork belly.  Seriously good stuff.

Momofuku Crispy Pork Buns

Momofuku Crispy Pork Buns

Momofuku Crispy Pork Buns

From David Chang
Steamed Buns

  • 1 tablespoon plus 1 teaspoon active dry yeast
  • 1 1/2 cups water at room temperature
  • 4 1/2 cups bread flour
  • 6 tablespoons sugar
  • 3 tablespoons nonfat dry milk powder
  • 1 tablespoon salt
  • 1/2 teaspoon rounded baking powder
  • 1/2 teaspoon baking soda
  • 1/2 cup rendered pork fat or vegetable shortening at room temperature plus more for shaping the buns as needed
  1. Combine all the ingredients in the bowl of a stand mixer outfitted with the dough hook. Mix at the lowest possible speed for 10 minutes. The dough should gather together into a neat, not too tacky ball on the hook. When it does, lightly oil a medium mixing bowl and put the dough in it. Cover the bowl with a dry kitchen towel. Place in a warmish place. Allow the dough to rise until it doubles in bulk, around 1 hour, 15 minutes.
  2. Punch the dough down and turn it out onto a clean work surface. Using a bench scraper or a knife, divide the dough in half, then divide the half into 5 equal pieces. Gently roll the pieces into logs, then cut each log into 5 equal pieces, making 5o pieces total. They should weigh about 25 grams each (or the size of a ping pong ball). Roll each piece into a ball. Cover the dough balls with a draping of plastic wrap and allow them to rest and rise for 30 minutes.
  3. Cut our fifty 8 cm squares of parchment paper. Coat a chopstick with the fat you are working with.
  4. Flatten out one ball with the palm of your hand, then using a rolling pin to roll it out into a 8 cm long oval. Lay the greased chopstick across the middle of the oval and fold the oval over onto itself to form the bun shape. Withdraw the chopstick, leaving the bun folded, and put the bun on a square of parchment paper. Stick it back under the plastic wrap (or dry kitchen towel) and form the rest of the buns. Let the buns rest for 30 to 45 minutes; they will rise a little.
  5. Set up a steamer on the stove. Working in batches so you don’t crowd the steamer, steam the buns on the parchment squares for 10 minutes. Remove the parchment paper. You can use the buns immediately (reheat them in the steamer for a minute or so if necessary) or allow to cool completely, then seal in plastic freezer bags and freeze for up to a few months. Reheat the frozen buns in a stovetop steamer for 3 minutes, until puffy, soft and warmed all the way through.

Crispy Pork Belly

  • 1 kilo pork belly
  • 50 grams salt
  • 4 cloves garlic, peeled
  • 1/2 onion, peeled
  • 2 bay leaves
  1. Place the pork belly, salt, garlic and onion in a large pot and cover with water. Bring to a simmer and cook for 1 1/2 hours until the pork is tender. Remove from the pot and allow the pork to cool. Once cool, place the pork on a plate and keep uncovered in the refrigerator for at least 3 hours.
  2. Heat a deep fat fryer to the lowest setting (mine was 150c) and fry the pork for 20 minutes. Remove, cool and again place in the refrigerator, at least 3 hours.
  3. For the final cooking, heat the deep fat fryer to it’s highest setting (mine was 190 c), fry the pork again for 10 minutes until the skin crisps up. Remove, drain and slice for the pork buns.

For the pickled cucumbers
slice 2 cucumbers thinly, add 1 tablespoon sugar and 1 teaspoon salt. Let sit for 5 to 10 minutes before using.
To Assemble

  • 1 steamed bun
  • 2 slices of the crispy pork belly
  • hoisin sauce
  • pickled cucumbers
  • spring onions, thinly sliced
  • sriracha sauce for serving
  1. Open the bun and spread some hoisin sauce. Add the cucumbers, then layer with the crispy pork belly, and finally top with the spring onions.
  2. Serve with sriracha sauce on the side.

Read Full Post »

Momofuku Style Chicken Adobo

This month, the Kulinarya Cooking Club decided to feature Adobo!  To many, this is considered our national dish.  Ask any Filipino and they will tell you that they have the “best” adobo recipe.  It’s no wonder that there are so many variations of this dish.  But I tell you – I think I have discovered THE BEST EVER recipe for chicken adobo.  (I can already see many Filipinos raising their hands in protest!).  But I stand by my statement!

Traditionally, in our home we simmer a combination of pork and chicken in a marinade of soy sauce, vinegar, bay leaves, black peppers and garlic.  Once done, the meat is removed from the sauce and pan fried separately while the sauce is simmered further to obtain a rich and thicker sauce.  Before serving, the meat is once again reunited with the thickened sauce.  Many filipinos will insist that adobo be served with a bowl of rice (either garlic fried or steamed) but other than that, “the day after adobo” is excellent as a sandwich filling (in our house we usually lather it with tons of mayonnaise).

I wanted to try something different with the adobo this month so I experimented with David Chang’s Fried Chicken with Octo-vin recipe.  I’ve had a lot of success with the Momofuku cookbook – the Chicken and Egg recipe can be found here and the Fried Chicken with the Octo-Vin has been previously featured in Almost Bourdain’s site here.

Reading through the recipe for the Fried Chicken, I thought it would be an interesting twist to use David Chang’s technique for his fried chicken.  First he brines the chicken for several hours, then steams it, lets in dry in the refrigerator and finally pan fries the chicken.  It is then served with a sauce he refers to as Octo-Vin.

Chicken Adobo - Momofuku Style

So for my version, I pretty much stuck to the Momofuku tecnique but  my brine solution was the adobo marinade.  I also changed the octo-vin by cooking it in a saucepan and adapted the ingredients so that the adobo flavours came out.  To be completely honest I was a bit hesitant to use Philippine white vinegar instead of the rice wine vinegar in the original recipe but I was amazed at the resulting sauce – very intense and the flavours blended beautifully.   I like to call it the Pinoy Octo-Vin.  Yes there is a lot of work to this recipe but I promise you – the results are worth it.

Recipe for the Fried Chicken (serves 4)

  • 6 chicken thigh cutlets (I deboned mine)
  • 4 cups lukewarm water
  • 1/2 cup white sugar
  • 1/2 cup light soy sauce
  • 2 tablespoons white vinegar (Philippine brand preferably)
  • 4 garlic cloves, crushed
  • 2 bay leaves
  • a few peppercorns, left whole
  • Canola or grapeseed oil for frying
  1. Combine the water, sugar, soy sauce, vinegar, garlic,  bay leaves and peppercorns in a container and stir to dissolve the sugar.  Add the chicken and cover.  Refrigerate for at least 1 hour and no more than 6 hours.
  2. Set up a steamer on the stove.  Drain the chicken and place the brine on the bottom of the steamer (this is your steaming liquid).  Put the chicken in the steamer basket and cover.  Steam the chicken for 40 minutes on medium high heat.  When done, remove it from the steamer and put in on a cooling rack to cool.  Chill it in the refrigerator on the rack at least 2 hours (or overnight).
  3. Remove the chicken from the refrigerator 3o minutes before you cook it.
  4. In a deep skillet, heat enough oil for the chicken (I only pan fried the chicken).  Fry the chicken in batches until the skin is deep brown and crisp.  Around 6 to 8 minutes.
  5. Remove to a paper towel lined plate to drain.

Pinoy Octo-Vin (Filipino Style Octo Vinaigrette)

For the Octo-Vinaigrette

  • 2 garlic cloves, (I used confit garlic cloves but plain garlic will suffice)
  • 2 tablespoons coconut milk
  • 1/4 cup light soy sauce
  • 2 tablespoons white vinegar (Philippine brand is preferable)
  • 1 bay leaf
  • 4 to 6 peppercorns
  • 1 teaspoon white sugar
  • 2 tablespoons grapeseed or other neutral oil

Mix all ingredients in a saucepan and heat over low for 10 minutes.  Serve on top of the Fried Chicken.

Kulinarya was started by a group of Filipino foodies living in Sydney, who are passionate about the Filipino culture and its colourful cuisine.

Each month we will showcase a new dish along with their family recipes. By sharing these recipes, we hope you find the same passion and love

for Filipino Food as we do.

If you’re interested in joining our Kulinarya Cooking Club, please feel free to drop by our foodblogs and leave a comment – we would love to

hear from you!

Trissa, Kath and Trish

http://sugarlace.com

http://www.acupcakeortwo.com/

Welcome new Kulinarya Members (if I have missed anyone out PLEASE email me!)

Olive http://www.latestrecipes.net/

Caroline http://whenadobometfeijoada.blogspot.com/

Peachy http://www.thepeachkitchen.com/

Althea http://www.busogsarap.com/

Stumble It!

Read Full Post »

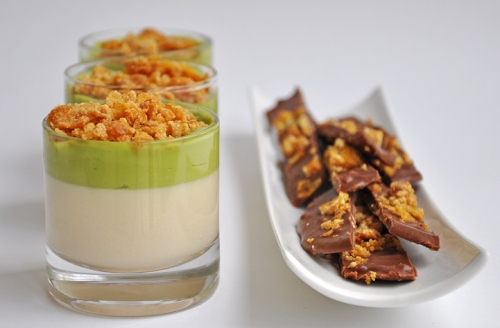
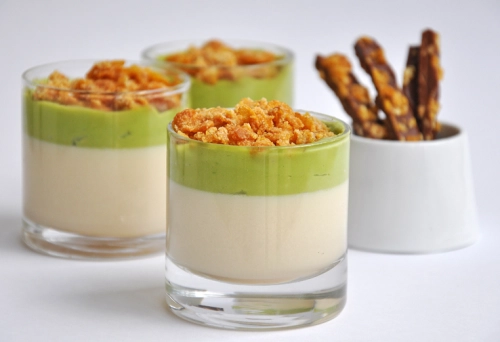
Cereal Milk "panna cotta", avocado puree, caramelized cornflakes and that chocolate peanut butter thing

How important is breakfast to you?  What do you normally have? Do you sit down with a great big bowl of cereal and milk to start your day?  What about some toast with peanut butter? Or maybe even toast with avocado? Sounds like pretty standard breakfast fare to me… boring even…

After trying Momofuku’s Cereal Milk (which is supposed to be a dessert :)), you may never look at breakfast food in the same way again!  Cereal Milk was the brainchild of Christina Tosi, Momofuku’s Pastry Chef.  It is a panna cotta infused with cereal, avocado puree, caramelized cornflakes and a great slab of chocolate.  This dessert is definitely something you would want to end your day with… and maybe even start it!

Don’t be intimated by this dessert, there are lots of components but everything is easy to make and the results are worth it!

Recipe – adapted from David Chang’s Momofuku

  • 6 cups cornflakes
  • 3 cups whole milk
  • 2 cups heavy cream
  • 1/4 cup brown sugar
  • 2 teaspoons salt
  • 3 sheets gelatin (titanium strength, weighing 6 grams each)

Garnish

Avocado Puree (recipe follows)

Chocolate Peanut Butter Thing (recipe follows)

Caramelized Cornflakes (recipe follows)

  1. Pre-heat the oven to 300F (150c, fan forced).  Spread the cornflakes on a baking sheet and pop it in the oven.  Toast the cereal for 12 minutes, it will deepen lightly in colour and more so in flavour.  Cool the cereal on the sheet for a few minutes just until it’s no longer hot to the touch.
  2. Combine the milk and cream in a container large enough to accommodate them and the cornflakes.  Add the warm cornflakes, stir to combine, and let steep for 30 minutes (I initially did this for 40 minutes which was too long, had to throw out the first batch as the finished custard was too starchy.)
  3. Strain the milk, passing it through a fine mesh sieve and pressing on the cornflakes with the back of a rubber spatula to extract as much liquid from them as possible.  Pass the milk through the strainer one more time and transfer to a microwave-safe container.  You should have around 3 cups of liquid. (This is important to note because when you add the gelatin sheets, the amount you add will depend on how much liquid you have.  If you  get less or more liquid then adjust the amount of gelatin)
  4. Add the brown sugar and salt to the milk, and heat it in the microwave on low power for 1 1/2 minutes – just long enough for the sugar to dissolve easily.  Give the milk a quick gentle stir to help disperse the sugar.
  5. Soften the gelatin in 2 cups of cold water.  After 2 to 3 minutes – when it’s supple and no longer crisp, remove it from the water, wring it out, and add it to the cereal milk.  Stir it once or twice to melt the gelatin in the milk.
  6. Divide the milk among eight 5 to6 ounce ramekins, or use a silicone mold.  If you are serving the custard out of the containers you chilled it in, cover them and reserve until ready to serve.  If you’re using silicone molds, put them in the freezer for an hour or so, and custard blocks will pop out just like ice cubes.  Store them in the refrigerator until ready to use.
  7. To serve, plop a large dollop – a couple of tablespoons – of avocado puree just off the center of 8 large white places, then use the back of the spoon to drag some of it across each plate.  Put a cereal milk custard down in the avocado trail, leave a cup of chocolate peanut butter thing up against it, and scatter caramelized cornflakes on the plate with restraint.  Otherwise, if serving in a clear glass or ramekin, spoon some avocado puree on top of the custard and sprinkle the caramelized cornflakes to finish.

Avocado Puree – prepare the puree as close as possible to the time you intend to serve it.

  • 1 ripe hass avocado, halved, pitted and peeled
  • pinch of citric acid
  • pinch of kosher salt
  • pinch of sugar
  1. Chill the avocado until cold, or for up to 5 hours.
  2. Combine the avocado, citric acid, salt and sugar in a blender or food processor and process until smooth.  Place in a bowl with a piece of plastic wrap pressed up against the exposed surface of the puree, until ready to serve.

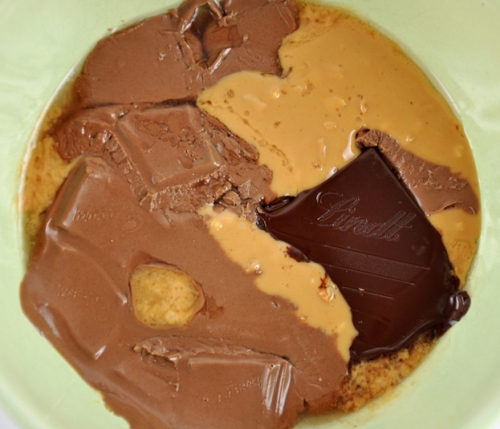
Milk Chocolate, Peanut Butter, Dark Chocolate

Chocolate Peanut Butter Thing (the original recipe is a chocolate hazelnut thing that calls for gianduja and and praline paste but I substituted peanut butter for the praline paste and milk chocolate for the gianduja instead)

  • 1/4 cup praline paste or peanut butter
  • 1/3 cup gianduja or milk chocolate
  • 1/4 teaspoon grapeseed oil or any neutral oil
  • pinch of salt
  • 1 tablespoon smallish pieces bittersweet chocolate, ideally 70% to 72% cacao range
  • 1/2 teaspoon light corn syrup
  • 2 tablespoons caramelized cornflakes
  1. Combine the peanut butter, milk chocolate, oil salt, chocolate and corn syrup in a microwave-safe container and stir to combine.  Microwave the mixture or 10 seconds, then stir it up, and repeat four or five more times, until the mixture is fluid and homogeneous.
  2. Spread the mixture out in a 1/4 inch thick layer (not any thinner) on a silpat lined baking sheet, and scatter the chocolate puddle with the caramelized cornflakes.   Freeze it to set, which should take around 20 minutes (though you can leave it in the freezer longer).
  3. Grab the frozen piece of chocolate peanut butter thing from the freezer and break it into random, uneven pieces.  Store them in a sealed contained in the freezer until ready to use, or for up to a few weeks.

Chocolate Peanut Butter Thing

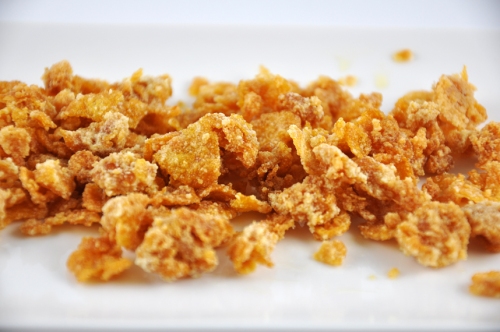
Caramelized Cornflakes

  • 3/4 cup cornflakes
  • 3 tablespoons dry powdered milk
  • 1 tablespoon sugar
  • 3 tablespoons unsalted melted butter
  1. Heat the oven to 275F (130c fan forced).  Put the cornflakes in a large bowl and crush them with your hands.  Seven or eight squeezes should be enough, you want crumbles, not powder.
  2. Stir together the milk powder, sugar, and salt in a small bowl.  Add the butter to the cornflakes and sprinkle the sugar mixture over them.  Toss and stir to coat the cereal evenly.
  3. Spread out the cereal on a baking sheet lined with parchment paper (or silpat) and bake for 20 minutes, or until the milk powder and sugar start to caramelize and turn a satisfying deep golden colour.  Remove from the oven and let cool.  The flakes will keep, in a sealed container at room temperature, for at least a week.

Caramelized Cornflakes

Lastly, if you are so inclined to make your own praline paste – here it is:

Praline Paste

  • 1/2 cup whole hazelnuts
  • 1/2 cup sugar
  • tiny pinch of salt
  1. Heat the oven to 400F (200 C fan forced)
  2. Spread out the hazelnut on a rimmed baking sheet and toast them in the oven for 10 to 15 minutes until they’ve warmed through and aromatic.  Remove from the oven and let cool.
  3. Put the sugar in a heavy-bottomed pot over medium-low heat.  Leave it alone and let it start to caramelize around the edges of the pan before you begin to stir it with a heatproof spatula or wooden spoon.  Patiently and attentively shepherd the sugar into a state of delicious caramelization: stir it slowly and constantly, until it’s medium amber – like the color of grade B maple syrup – and is very fluid.
  4. Put the hazelnuts into a food processor, add the caramel and salt and process for 3 to 5 minutes, scraping down the hot sweet mush from the sides of the bowl as often as necessary until it comes together into a smooth, even paste.  Store the praline in the refrigerator for weeks, if not months, until ready to use.

Cereal Milk - Momofuku

Note:  The first time I made this the gelatin did not set as I used too little gelatin for the liquid I had resulting in a big glob (though very tasty).  I was relying on the recipe which said 2 sheets (4 grams) but the resulting panna cotta  was too soft.  I was ready to start again but got some great advice from Y of Lemonpi who suggested that I could melt the glob again really gently and add more pre-soaked gelatin.   It worked beautifully!

Gelatin sheets vary a lot so to avoid this happening to you, take note of how much gelatin is needed to set the liquid, it should be written at the back of the pack. Otherwise, if you need more gelatin to set the custard, follow Y’s advice!

Read Full Post »

DSC_0955

Adapted from David Chang's Chicken and Egg Recipe

I had never heard of David Chang or Momofuku until two weeks ago. While browsing the New York Times I came across an article on him. I was intrigued. Ferran Adria thought he was magical. A chef of prodigious talent. Anthony Bourdain thought he was scary, smart, funny, and ambitious and the guy that all chefs had to measure themselves against these days and even Martha Stewart was a fan!

I had a sneaky suspicion that I would not be able to cook much out of his new cookbook – I had read a review that some recipes required “meat glue” – uhmm what?! But, I had to get the cookbook anyway.

I’m so glad I did.

The first recipe I laid my eyes on was his Chicken and Egg Recipe (Click here to see the original dish and recipe in all it’s beauty!). There was just something so comforting about a bowl of steaming rice topped with a slow poached egg and beautifully crisped confit of chicken. Let me warm you straight up – this is not a quick and easy meal to prepare. I am pretty sure you can get a dish that looks very similar by pan frying some chicken thighs and poaching an egg but it’s not going to taste anywhere are fantastic. This dish is truly truly inspired. If you have a few hours on a Sunday and was thinking of making a roast – try this instead. The process is not hard, just a bit time consuming – but worth it. Take my word for it. If you don’t trust me, take my husband’s word for it – he said “all chicken should be cooked this way”.

DSC_0945

Chicken and Egg

Recipe

Note: David Chang’s recipe calls for the chicken to be cold smoked. I didn’t have the cold smoker but his recipe does provide an alternative which is what I did with great results.

Serves 4

  • 8 cups lukewarm water
  • 1 cup plus 1 tablespoon sugar
  • 1 cup plus 1 teaspoon salt
  • 4 boneless chicken legs (I used 8 chicken thighs)
  • 2 strips smoky bacon (this is the alternative for those who don’t have a cold smoker – that’s me!)
  • 5 cups rendered pork or duck fat or grapeseed oil (I used grapeseed oil)
  • 2 cucumbers
  • 4 cups cooked short-grain rice
  • 4 slow poached eggs (recipe follows)
  • 1/2 cup sliced scallions (I used chives, I know – not the same but I didn’t have any on hand)
  1. Combine the water, 1 cup sugar and 1 cup salt in a large container with a lid and stir to dissolve. Add the chicken, cover or seal and refrigerate for at least 1 hour, no more than 6.
  2. Remove the chicken from the brine and discard the brine. Heat the oven to 82c and pack the chicken snugly into a pot or other oven safe vessel – the less extra space there is , the less fat is required to submerge the chicken. Tuck the smoked bacon in the dish as well. Heat the fat/oil and pour it over the chicken. Put the chicken in the oven and cook for 50 minutes (hey it’s me here – I actually cooked it for 3 hours as after 50 minutes it didn’t look all that cooked to me). Remove from the pot oven and cool to room temperature.
  3. If not using immediately, put the chicken in the refrigerator to thoroughly chill it in the fat. The chicken can be prepared through this step a week or more in advance.
  4. When you’re ready to serve the dish, heat the chicken confit in the pot in a low oven (around 80c) or on the stove top just until the fat liquefies.
  5. Remove the bones and fry the chicken (skin side only) over medium high heat until crisp.
  6. Portion the rice in four bowls and use the back of the spoon to create a shallow space in the middle and slide the slow poached egg into it. Divide the cucumber pickles among the bowl (recipe follows but I didn’t bother with this), nestling them together in a little mound. Add the chicken around the bowl and sprinkle with the scallions (or in my case, chives) and serve.
Collage

Which came first? The chicken or the egg?

Cucumber Pickle Recipe

Slice the cucumbers into coins a little less than 1/2 inch think. Toss with the remaining 1 tablespoon sugar and 1 teaspoon salt in a small bowl and allow it to sit until ready to use.

Slow Poached Egg Recipe

  1. Fill the biggest pot you can find with water (this is important because a pot of hot water is hotter at the bottom and coolest on the surface. Using a big pot ensures that the greatest volume of water at the right temperature) and put it on the stove at the lowest possible heat.
  2. Use something to keep the eggs from sitting on the bottom (I used a steam rack).
  3. Using an instead read thermometer to monitor the temperature of the water, heat the water until it reaches 60c to 62c. Let the eggs bathe for 40 to 45 minutes. Make sure that the temperature stays that that constant temperature – if it is too hot add some ice. If not enough heat, crank up the heat a little bit.
  4. You can use the eggs immediately or store them in the fridge for up to 24 hours. If you refrigerate the eggs, warm them under piping hot water for 1 minute before using.
  5. To serve the eggs, crack them one at a time into a small saucer. The thin white layer will not and should not be firm or solid; tip the dish to pour off a discard the loosest part of the white, then slide the egg onto the dish it’s destined for.

Delicious Life Blog painstakingly went through the internet to find recipes from the Ad Hoc cookbook (another keeper!). I thought it was such a great idea, I’m doing the same for Momofuku.

Fried Chicken with Octo Vin – From the Time Out New York Website

Pork Belly and Steamed Buns – From Time Out New York Website

Perfectly Prickly Cabbage Kimchi – From MSNBC

Marinated Hanger Steak Ssam – From Wall Street Journal

Ginger Scallion Noodles with Ginger Scallion Sauce – From Amazon.com (you can also order the book there!)

Other Recipes by David Chang

Chawan Mushi from Foos & Wine

Clay Pot Miso Chicken – from Gourmet

Stumble It!

Read Full Post »