Feeds:
Posts
Comments

Posts Tagged ‘breakfast’

Hazelnut, Labneh and Honey Toast

Hazelnut, Labneh and Honey Toast

Oh wow – how time flies. My poor neglected blog. It’s been nearly a year since I wrote anything and somehow I feel like I have to give you an excuse for the silence… The reality is life got in the way. New passions (Yoga! Running!), work, travel and I started trying to be healthier too. Somehow, it didn’t make sense for me to cook the same rich and heavy food I used to. I didn’t have time to make long and complicated recipes anymore… So the blog took a long break.

Sometimes people would ask me if I still updated my blog and I would always shrug it off and say “I’m too busy” but at the back of my mind, I knew I would one day revive it and maybe today’s the day? Who knows… I have good intentions and great (mostly healthy) recipes to share but I’ve also been there before where I’ve resurrected this blog with a few posts for a month or two… so let’s see. Hopefully this is a new beginning – a simple new beginning.

This is not so much a recipe but a guide to make pretty amazing toast. I don’t even need to write the recipe down – it’s that simple.

Start with some homemade labneh. Get some full cream Greek yogurt, and place it in a muslin/cheese cloth. Place the muslin over a strainer and the strainer over a bowl which will allow the whey to drain from the yogurt. Wait 24 hours before serving.

The toast some hazelnuts, in an oven at 160c for 15 minutes, and chop. Get some good quality sourdough (I used soy and linseed) and spread the labneh, then the roasted hazelnuts and finally some honey (I used honeycomb) and a pinch of salt. Bon Appetit, where I got the recipe from, also suggests some olive oil and a few turns of pepper which sounds lovely as well.

Homemade Labneh

Homemade Labneh

Read Full Post »

Cooking Lessons

Eggs and Caviar with "Soldiers"

More than seven years ago I attended my first ever cooking class.  Actually, it was a week long “Introduction to Cooking” class at the Institute of Culinary Education (ICE).  My husband (then fiance) was studying in New York and that time I visited him he had accepted a summer internship which meant long days (and nights) at his new office.  I was starting to take an interest in cooking and decided a crash course at ICE would keep me occupied during the day.

The course was spread over five days – each day a new technique was introduced – for example pan-frying, braising, roasting, baking etc.  The first hour of the usually six to seven hour class was having our instructor talk through the logic behind why a certain technique was used for cooking.  For instance, pan frying was used when you wanted to cook something very quickly, usually reserved for the more “expensive cuts” or fish.  Braising was used to ensure a very tough piece of meat was cooked long enough to break down tough connective tissue and usually reserved for the “cheaper cuts”.

I still remember how in awe I was when our instructor would take us around the kitchen and show us different ingredients and equipment.

On the second day she gathered us around the kitchen and showed us a basket of freshly picked herbs.   There were over ten different herbs that day and she asked for each one:

“Can anyone tell me what this herb is?” she asked.

Believe it or not, I could not identify a single one!  Everyone else in the class was so switched on and I could only wonder how they managed to identify each herb with ease.

Finally, she took out one that I thought I almost recognized.  It was a dark green herb, long and slim.  “Scallion!” I shouted.  Finally glad to have contributed to the day’s discussion.

“Actually, very close, from the same family, but these are chives” replied our instructor.

Even the one I was fairly certain of, I got wrong!

That day, after class I decided that I would stay back and ask Ms. King to help me identify each and every herb and in order that I wouldn’t forget, I drew each one in my little notebook, certain that I would never again forget.

The only thing that I didn’t realize is that when I got home, I guess in part due to my really bad drawing skills, almost all the herbs looked exactly the same!

In was only years later, with constant practice, that I managed to learn and identify every herb by heart.

Eggs and Caviar

Another thing I learned in Ms. King’s class was how to make scrambled eggs, french style, with soldiers.  That day she took out an egg topper and showed us how to cut the tops of eggs so that we could re-use them and fill them with scrambled eggs.  I think that day’s lesson may have been how to use  the stove top and so she taught us how to scramble eggs over a bain marie. While the resulting eggs were fantastic, I honestly taught that the extra 20 or so minutes spent watching the eggs turn into a soft and buttery mass was not worth the effort.

What was worth the effort though were the adorable and  buttery “soldiers” that was used as a “spoon” to dunk into the scrambled eggs.

On our last day I learned that our instructor, Ms King, had written a cookbook called Fish.  I asked her if she could kindly sign my copy.

“Sure.  Is there anything in particular you want me to write?” she asked.

“If you wouldn’t mind, could you put ‘To my best student’?”  I replied.

She just gave me a big laugh and said to collect the book after the class.

At the end of the class, I collected my book, and found she had kindly written the dedication I asked for!

Eggs and Caviar served with Soldiers

Scrambled Eggs with Caviar and Buttery Soldiers

Recipe (serves 2)

  • 4 fresh eggs
  • 1 teaspoon chives
  • 3 tablespoons milk or cream
  • large dollop of butter for the scrambled eggs and for the soldiers.
  • salt and pepper to taste
  • dollop of caviar for topping (optional)
  • 4 slices of white toast, edges removed, and cut with a serrated knife into 4
  1. Using an egg topper, cut four eggs open and empty the contents onto a bowl.  If you don’t have an egg topper, I have seen people use a serrated knife before, just be careful when doing so.
  2. To clean the egg shells, bring a pot of water to the boil and carefully submerge each shell for a few seconds. Remove and allow to dry.
  3. Now, lightly beat the eggs, chives and cream into a bowl.
  4. In a pan, heat the butter until melted and quickly add the eggs.
  5. Over low heat, gently stir the eggs until they come together in a soft mass.  Be careful not to overcook the eggs (as they won’t taste as good and they will be difficult to spoon back in to the shells)
  6. Season with salt and pepper.
  7. Spoon the eggs back into the shells and top with some caviar.
  8. To make the soldiers (this can be done before the eggs are made), heat some butter in a pan and then add the pieces of toast.  Heat the toast until nicely browned and then remove the toast, add more butter to the pan and heat the other side.

Stumble It!

Read Full Post »

Cereal Milk "panna cotta", avocado puree, caramelized cornflakes and that chocolate peanut butter thing

How important is breakfast to you?  What do you normally have? Do you sit down with a great big bowl of cereal and milk to start your day?  What about some toast with peanut butter? Or maybe even toast with avocado? Sounds like pretty standard breakfast fare to me… boring even…

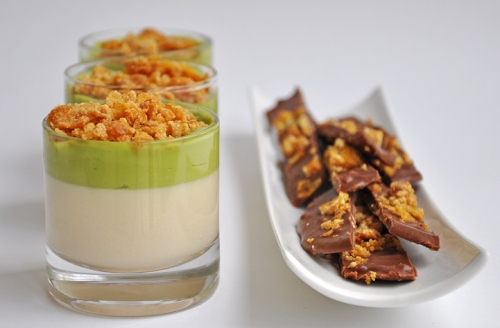
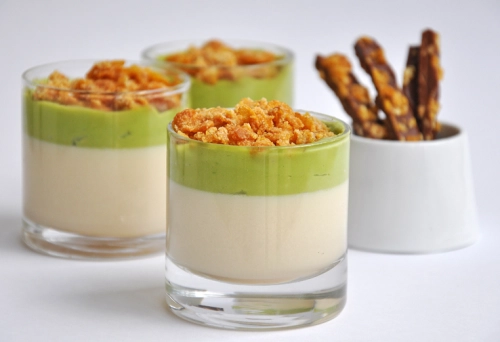
After trying Momofuku’s Cereal Milk (which is supposed to be a dessert :)), you may never look at breakfast food in the same way again!  Cereal Milk was the brainchild of Christina Tosi, Momofuku’s Pastry Chef.  It is a panna cotta infused with cereal, avocado puree, caramelized cornflakes and a great slab of chocolate.  This dessert is definitely something you would want to end your day with… and maybe even start it!

Don’t be intimated by this dessert, there are lots of components but everything is easy to make and the results are worth it!

Recipe – adapted from David Chang’s Momofuku

  • 6 cups cornflakes
  • 3 cups whole milk
  • 2 cups heavy cream
  • 1/4 cup brown sugar
  • 2 teaspoons salt
  • 3 sheets gelatin (titanium strength, weighing 6 grams each)

Garnish

Avocado Puree (recipe follows)

Chocolate Peanut Butter Thing (recipe follows)

Caramelized Cornflakes (recipe follows)

  1. Pre-heat the oven to 300F (150c, fan forced).  Spread the cornflakes on a baking sheet and pop it in the oven.  Toast the cereal for 12 minutes, it will deepen lightly in colour and more so in flavour.  Cool the cereal on the sheet for a few minutes just until it’s no longer hot to the touch.
  2. Combine the milk and cream in a container large enough to accommodate them and the cornflakes.  Add the warm cornflakes, stir to combine, and let steep for 30 minutes (I initially did this for 40 minutes which was too long, had to throw out the first batch as the finished custard was too starchy.)
  3. Strain the milk, passing it through a fine mesh sieve and pressing on the cornflakes with the back of a rubber spatula to extract as much liquid from them as possible.  Pass the milk through the strainer one more time and transfer to a microwave-safe container.  You should have around 3 cups of liquid. (This is important to note because when you add the gelatin sheets, the amount you add will depend on how much liquid you have.  If you  get less or more liquid then adjust the amount of gelatin)
  4. Add the brown sugar and salt to the milk, and heat it in the microwave on low power for 1 1/2 minutes – just long enough for the sugar to dissolve easily.  Give the milk a quick gentle stir to help disperse the sugar.
  5. Soften the gelatin in 2 cups of cold water.  After 2 to 3 minutes – when it’s supple and no longer crisp, remove it from the water, wring it out, and add it to the cereal milk.  Stir it once or twice to melt the gelatin in the milk.
  6. Divide the milk among eight 5 to6 ounce ramekins, or use a silicone mold.  If you are serving the custard out of the containers you chilled it in, cover them and reserve until ready to serve.  If you’re using silicone molds, put them in the freezer for an hour or so, and custard blocks will pop out just like ice cubes.  Store them in the refrigerator until ready to use.
  7. To serve, plop a large dollop – a couple of tablespoons – of avocado puree just off the center of 8 large white places, then use the back of the spoon to drag some of it across each plate.  Put a cereal milk custard down in the avocado trail, leave a cup of chocolate peanut butter thing up against it, and scatter caramelized cornflakes on the plate with restraint.  Otherwise, if serving in a clear glass or ramekin, spoon some avocado puree on top of the custard and sprinkle the caramelized cornflakes to finish.

Avocado Puree – prepare the puree as close as possible to the time you intend to serve it.

  • 1 ripe hass avocado, halved, pitted and peeled
  • pinch of citric acid
  • pinch of kosher salt
  • pinch of sugar
  1. Chill the avocado until cold, or for up to 5 hours.
  2. Combine the avocado, citric acid, salt and sugar in a blender or food processor and process until smooth.  Place in a bowl with a piece of plastic wrap pressed up against the exposed surface of the puree, until ready to serve.

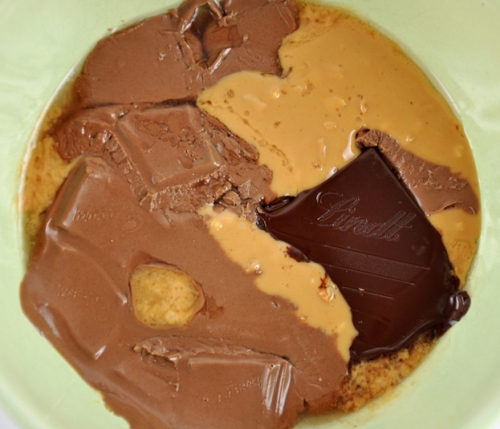
Milk Chocolate, Peanut Butter, Dark Chocolate

Chocolate Peanut Butter Thing (the original recipe is a chocolate hazelnut thing that calls for gianduja and and praline paste but I substituted peanut butter for the praline paste and milk chocolate for the gianduja instead)

  • 1/4 cup praline paste or peanut butter
  • 1/3 cup gianduja or milk chocolate
  • 1/4 teaspoon grapeseed oil or any neutral oil
  • pinch of salt
  • 1 tablespoon smallish pieces bittersweet chocolate, ideally 70% to 72% cacao range
  • 1/2 teaspoon light corn syrup
  • 2 tablespoons caramelized cornflakes
  1. Combine the peanut butter, milk chocolate, oil salt, chocolate and corn syrup in a microwave-safe container and stir to combine.  Microwave the mixture or 10 seconds, then stir it up, and repeat four or five more times, until the mixture is fluid and homogeneous.
  2. Spread the mixture out in a 1/4 inch thick layer (not any thinner) on a silpat lined baking sheet, and scatter the chocolate puddle with the caramelized cornflakes.   Freeze it to set, which should take around 20 minutes (though you can leave it in the freezer longer).
  3. Grab the frozen piece of chocolate peanut butter thing from the freezer and break it into random, uneven pieces.  Store them in a sealed contained in the freezer until ready to use, or for up to a few weeks.

Chocolate Peanut Butter Thing

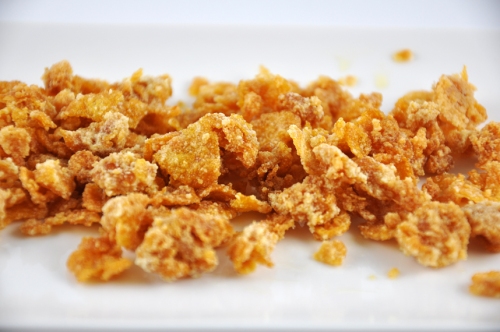
Caramelized Cornflakes

  • 3/4 cup cornflakes
  • 3 tablespoons dry powdered milk
  • 1 tablespoon sugar
  • 3 tablespoons unsalted melted butter
  1. Heat the oven to 275F (130c fan forced).  Put the cornflakes in a large bowl and crush them with your hands.  Seven or eight squeezes should be enough, you want crumbles, not powder.
  2. Stir together the milk powder, sugar, and salt in a small bowl.  Add the butter to the cornflakes and sprinkle the sugar mixture over them.  Toss and stir to coat the cereal evenly.
  3. Spread out the cereal on a baking sheet lined with parchment paper (or silpat) and bake for 20 minutes, or until the milk powder and sugar start to caramelize and turn a satisfying deep golden colour.  Remove from the oven and let cool.  The flakes will keep, in a sealed container at room temperature, for at least a week.

Caramelized Cornflakes

Lastly, if you are so inclined to make your own praline paste – here it is:

Praline Paste

  • 1/2 cup whole hazelnuts
  • 1/2 cup sugar
  • tiny pinch of salt
  1. Heat the oven to 400F (200 C fan forced)
  2. Spread out the hazelnut on a rimmed baking sheet and toast them in the oven for 10 to 15 minutes until they’ve warmed through and aromatic.  Remove from the oven and let cool.
  3. Put the sugar in a heavy-bottomed pot over medium-low heat.  Leave it alone and let it start to caramelize around the edges of the pan before you begin to stir it with a heatproof spatula or wooden spoon.  Patiently and attentively shepherd the sugar into a state of delicious caramelization: stir it slowly and constantly, until it’s medium amber – like the color of grade B maple syrup – and is very fluid.
  4. Put the hazelnuts into a food processor, add the caramel and salt and process for 3 to 5 minutes, scraping down the hot sweet mush from the sides of the bowl as often as necessary until it comes together into a smooth, even paste.  Store the praline in the refrigerator for weeks, if not months, until ready to use.

Cereal Milk - Momofuku

Note:  The first time I made this the gelatin did not set as I used too little gelatin for the liquid I had resulting in a big glob (though very tasty).  I was relying on the recipe which said 2 sheets (4 grams) but the resulting panna cotta  was too soft.  I was ready to start again but got some great advice from Y of Lemonpi who suggested that I could melt the glob again really gently and add more pre-soaked gelatin.   It worked beautifully!

Gelatin sheets vary a lot so to avoid this happening to you, take note of how much gelatin is needed to set the liquid, it should be written at the back of the pack. Otherwise, if you need more gelatin to set the custard, follow Y’s advice!

Read Full Post »