Feeds:
Posts
Comments

Archive for the ‘Cook’ Category

The Spanish Pasta Dish to Rival Paella

Fideos (“Toasted Pasta” Paella)

It must be difficult being a noodle in Spain.  How can you stand up to the wonderful rice dishes that the Spaniards are known for.  Almost every Spanish cookbook I own will have a section on Paellas*, and at the back of the section is maybe one (if lucky) recipe on the fideos.  It doesn’t even get its own section!   It’s a pity that fideos tends to take second place to the Paella when I think it is just as delicious – and for me, a much more forgiving dish!

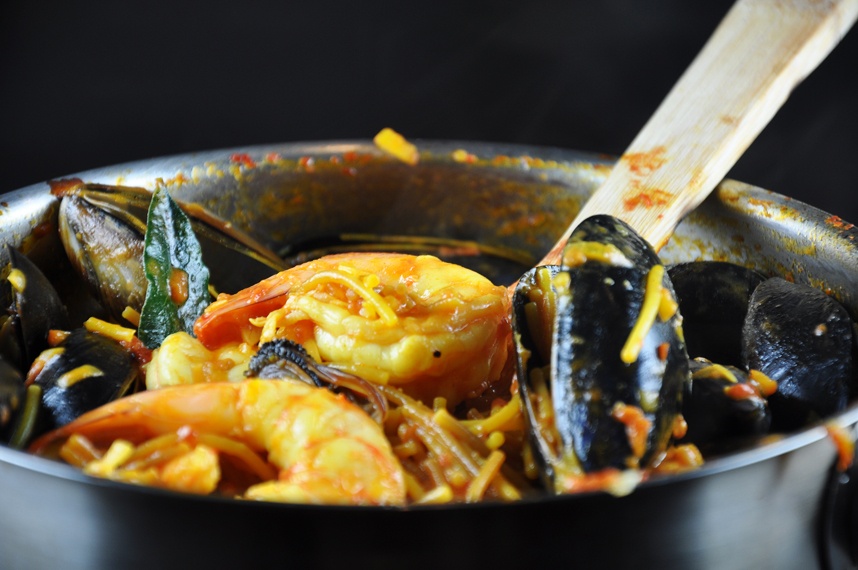
Fideos, translated into english, refers to noodles – they are thin pieces of noodles, no longer than your thumb.  Many recipes call for fideo noodles, there is no reason why you can’t use thin spaghetti or angel hair noodles, broken into 1.5 to 2 inch lengths.  In my Mom’s restaurant they used to bake their fideos with pork spareribs and sausages but today I’ve decided to share with you my version – with mussels and prawns.  A little bit healthier and just as good!

I like to think of fideos as the rebel dish.  It breaks a lot of rules!  Let me explain… with most pasta dishes you throw your noodles into a large pot of boiling water, enough water so that the pasta has enough space to float around.  With fideos, traditionally they are made in a paella pan and only enough liquid is placed so that the noodles absorb the cooking broth resulting in a rich, and flavourful dish.  When making a paella, I’ve been taught, once you add the broth, do not stir rice around.  How many of us have been tempted to STIR when we were told NOT TO STIR?!  Well, as I said, fideos is more forgiving – you stir the dish often enough until you see that the liquid has coated the noodles and seafood in an almost syrup like coating.

Traditionally fideos has been made with saffron.  If you aren’t willing to spend on good quality saffron, I wouldn’t even bother putting it as inferior quality saffron will hardly make a dent in the taste.  If you can’t get a hold of saffron, or don’t wish to shell out the money for it, I suggest you omit it completely.

Also, this is traditionally made in a paella pan.  Tonight, I couldn’t be bothered and  used a heavy based pan instead.  It turned out just as well!

As I said – this dish breaks a lot of rules!

Prawn and Mussel Fideos

Recipe (for two)

  • 120 grams fideos or dried angel hair pasta, broken into 2 inch lenghts
  • 3 tablespoons olive oil
  • 1/2 onion, finely diced
  • 2 cloves garlic, crushed
  • 1 teaspoon sweet paprika
  • 2oo grams canned tomatoes,  crushed
  • 375 ml fish or chicken stock (good quality store bought is fine)
  • 70 ml dry white wine
  • 1 bay leaf
  • 6 large prawns, peeled and deveined
  • a handful of mussels, cleaned and debearded OR you can use clams or a combination
  • salt and pepper to taste
  1. Heat a pan with one tablespoon of olive oil and lightly fry the fideos noodles until golden brown but not burned.   This should take around 5 minutes.
  2. Remove the noodles from the pan and set aside
  3. Next, add more olive oil and saute the onion and garlic until translucent.
  4. Add the sweet paprika and the canned tomatoes and cook until the tomato sauce is thick, this will take around 10 to 15 minutes.
  5. In a separate pan, heat the stock, white wine and the bay leaf.    Once boiling, add this to the tomato sauce.
  6. Immediately add the noodles and stir frequently until the noodles have absorbed the liquid.  This took me around 15 minutes.
  7. When you can see that the noodles are almost done, add the seafood and simmer gently for a minute or two until the prawns are cooked through and the mussels have fully opened.
  8. Serve immediately.

Fideos

*Interestingly enough, what we have come to know as Paella the rice dish made with all sorts of wonderful toppings from seafood, chorizo, rabbit etc., actually refers to the pan in which they are made in.  Over time however, people have started referring to the dish inself and not the pan as Paella.

Stumble It!

Read Full Post »

Spiced Nuts - perfect for those who prefer savoury treats!

I am one of those people who prefer savoury to sweet.  Given a choice between an entree or dessert, I prefer having and entree… or two!  So the next treat in my All They Want for Christmas Series is perfect for people like me!   These Indian-inspired spiced nuts are incredibly addicting.  They are moreish and it is impossible to stop at one.  This recipe was adapted from the Taste website.

Recipe – makes 3 jars (see above)

  • 250 grams of your favorite nuts (I used cashew, almonds, brazil nuts,  almonds, pistachios)
  • 1 egg white
  • 1 teaspoon peanut oil
  • 1 teaspoon each of ground cumin, ground coriander, garam masala, sweet paprika, ground fennel, ground turmeric
  • 1 teaspoon salt
  • freshly ground pepper

Method

  1. Preheat oven to 180°C (fan forced). Combine the nuts with the egg white, oil, cumin, coriander, garam masala, paprika, fennel and turmeric in a bowl. Season with salt and pepper. Place in a large roasting pan.
  2. Bake in oven, stirring every 5 minutes, for 15 minutes or until nuts are toasted and mixture is aromatic. Add raisins and gently toss to combine. Set aside for 30 minutes to cool to room temperature.

Package in little glass jars

Read Full Post »

Stuffed Mussels with ham, bechamel and melted cheese

When I was little, I would sometimes tag along with my Mom when she went to work.  Work, being her Spanish restaurant.  Over the 34  or so years of El Comedor (that means the “Dining Room” which was what the restaurant was called), some of my best memories was when I was allowed inside the kitchen to watch the cooks as they went about their work.

None of the cooks in El Comedor ever went to cooking school, I am pretty sure none of them even graduated high school.  They originally started as  house help (doing the cleaning) for my Grandmother (who we fondly called Mama).

When she started the restaurant they were tasked to cook in the kitchen.

Imagine if you will, a young man, Manny (his nickname for Manuel), who has never finished high school, who has never picked up a cookbook in his life, never held a chef’s knife, never tasted paella,  being asked to give up cleaning, the only job he has ever known,  to cook in a fine dining Spanish restaurant?  It must have taken a leap of faith by my Grandmother, and Manny to both give it a go!

When Ellie mentioned Spanish food to me recently, I realized that I have been very delinquent in posting some of the delicious recipes I remember eating so many years ago when Manny would sneak a little tapa to me while no one was looking. I must have looked like a drooling labrador to him, just watching him cook.  And I guess he took pity on me.

“Don’t tell your Mom okay?” he would say as he handed me a little croqueta or some of the stuffed mussels pictured above.  At the restaurant we called them Mejillones Relleñadas.     I call them – Mussels a la Manny.  They are made with mussels, ham, white wine, an uber creamy bechamel sauce and topped with parmesan cheese. This recipe is so simple and you can make it ahead, just top with parmesan cheese and let it rest in the refrigerator until you are ready to serve.  It’s perfect when you are expecting guests – just bake them in the oven prior to serving.

Sadly,  Manny passed away a few years ago but to this day I still think of him when I make this dish – from something that has very humble beginnings – such a beautiful dish!

Buen Provecho Manny!

They're delicious even without baking!

Recipe

  • 25 mussels, cleaned and debearded
  • 3 tablespoons butter
  • 1 tablespoon olive oil
  • 1/2 onion, diced
  • 2 cloves garlic, crushed
  • 1/4 cup ham, finely diced
  • 1/4 cup flour
  • 1/4 cup white wine
  • 3/4 cup milk
  • 3 tablespoons chopped parsley
  • grated parmesan cheese to top
  • salt and pepper to taste

Top with a sprinkle of parmesan cheese

  1. Place the mussels in a pot of cold water and bring to the boil.  When they are open, remove from the heat to cool.  Be careful not to overcook.  When they are cool enough to handle, remove the meat and chop (not too finely) and reserve half of the mussel shell.
  2. Heat the butter and olive oil in a sauce pan and add the onions, salt and pepper.  Add the garlic and cook until translucent.
  3. Add the ham and cook for another 2 minutes over medium heat.
  4. Add the flour and cook out for a few minutes, then add the white wine and cook for two minutes, and then gradually add the milk.
  5. Add the chopped mussel meat and the parsley.
  6. Place a spoonful on the reserved mussel shell.
  7. Top with parmesan cheese and bake in a 180c (fan forced) oven for 10 minutes until the cheese has melted.

Stuffed Mussels with ham, bechamel and parmesan cheese

BY THE WAY, on the side of this post is a link called RECEIVE EMAIL!  If you would like to be on my mailing list and receive an email when a new post is up – please click on the link.  Thank you!

Stumble It!

Read Full Post »

Cereal Milk "panna cotta", avocado puree, caramelized cornflakes and that chocolate peanut butter thing

How important is breakfast to you?  What do you normally have? Do you sit down with a great big bowl of cereal and milk to start your day?  What about some toast with peanut butter? Or maybe even toast with avocado? Sounds like pretty standard breakfast fare to me… boring even…

After trying Momofuku’s Cereal Milk (which is supposed to be a dessert :)), you may never look at breakfast food in the same way again!  Cereal Milk was the brainchild of Christina Tosi, Momofuku’s Pastry Chef.  It is a panna cotta infused with cereal, avocado puree, caramelized cornflakes and a great slab of chocolate.  This dessert is definitely something you would want to end your day with… and maybe even start it!

Don’t be intimated by this dessert, there are lots of components but everything is easy to make and the results are worth it!

Recipe – adapted from David Chang’s Momofuku

  • 6 cups cornflakes
  • 3 cups whole milk
  • 2 cups heavy cream
  • 1/4 cup brown sugar
  • 2 teaspoons salt
  • 3 sheets gelatin (titanium strength, weighing 6 grams each)

Garnish

Avocado Puree (recipe follows)

Chocolate Peanut Butter Thing (recipe follows)

Caramelized Cornflakes (recipe follows)

  1. Pre-heat the oven to 300F (150c, fan forced).  Spread the cornflakes on a baking sheet and pop it in the oven.  Toast the cereal for 12 minutes, it will deepen lightly in colour and more so in flavour.  Cool the cereal on the sheet for a few minutes just until it’s no longer hot to the touch.
  2. Combine the milk and cream in a container large enough to accommodate them and the cornflakes.  Add the warm cornflakes, stir to combine, and let steep for 30 minutes (I initially did this for 40 minutes which was too long, had to throw out the first batch as the finished custard was too starchy.)
  3. Strain the milk, passing it through a fine mesh sieve and pressing on the cornflakes with the back of a rubber spatula to extract as much liquid from them as possible.  Pass the milk through the strainer one more time and transfer to a microwave-safe container.  You should have around 3 cups of liquid. (This is important to note because when you add the gelatin sheets, the amount you add will depend on how much liquid you have.  If you  get less or more liquid then adjust the amount of gelatin)
  4. Add the brown sugar and salt to the milk, and heat it in the microwave on low power for 1 1/2 minutes – just long enough for the sugar to dissolve easily.  Give the milk a quick gentle stir to help disperse the sugar.
  5. Soften the gelatin in 2 cups of cold water.  After 2 to 3 minutes – when it’s supple and no longer crisp, remove it from the water, wring it out, and add it to the cereal milk.  Stir it once or twice to melt the gelatin in the milk.
  6. Divide the milk among eight 5 to6 ounce ramekins, or use a silicone mold.  If you are serving the custard out of the containers you chilled it in, cover them and reserve until ready to serve.  If you’re using silicone molds, put them in the freezer for an hour or so, and custard blocks will pop out just like ice cubes.  Store them in the refrigerator until ready to use.
  7. To serve, plop a large dollop – a couple of tablespoons – of avocado puree just off the center of 8 large white places, then use the back of the spoon to drag some of it across each plate.  Put a cereal milk custard down in the avocado trail, leave a cup of chocolate peanut butter thing up against it, and scatter caramelized cornflakes on the plate with restraint.  Otherwise, if serving in a clear glass or ramekin, spoon some avocado puree on top of the custard and sprinkle the caramelized cornflakes to finish.

Avocado Puree – prepare the puree as close as possible to the time you intend to serve it.

  • 1 ripe hass avocado, halved, pitted and peeled
  • pinch of citric acid
  • pinch of kosher salt
  • pinch of sugar
  1. Chill the avocado until cold, or for up to 5 hours.
  2. Combine the avocado, citric acid, salt and sugar in a blender or food processor and process until smooth.  Place in a bowl with a piece of plastic wrap pressed up against the exposed surface of the puree, until ready to serve.

Milk Chocolate, Peanut Butter, Dark Chocolate

Chocolate Peanut Butter Thing (the original recipe is a chocolate hazelnut thing that calls for gianduja and and praline paste but I substituted peanut butter for the praline paste and milk chocolate for the gianduja instead)

  • 1/4 cup praline paste or peanut butter
  • 1/3 cup gianduja or milk chocolate
  • 1/4 teaspoon grapeseed oil or any neutral oil
  • pinch of salt
  • 1 tablespoon smallish pieces bittersweet chocolate, ideally 70% to 72% cacao range
  • 1/2 teaspoon light corn syrup
  • 2 tablespoons caramelized cornflakes
  1. Combine the peanut butter, milk chocolate, oil salt, chocolate and corn syrup in a microwave-safe container and stir to combine.  Microwave the mixture or 10 seconds, then stir it up, and repeat four or five more times, until the mixture is fluid and homogeneous.
  2. Spread the mixture out in a 1/4 inch thick layer (not any thinner) on a silpat lined baking sheet, and scatter the chocolate puddle with the caramelized cornflakes.   Freeze it to set, which should take around 20 minutes (though you can leave it in the freezer longer).
  3. Grab the frozen piece of chocolate peanut butter thing from the freezer and break it into random, uneven pieces.  Store them in a sealed contained in the freezer until ready to use, or for up to a few weeks.

Chocolate Peanut Butter Thing

Caramelized Cornflakes

  • 3/4 cup cornflakes
  • 3 tablespoons dry powdered milk
  • 1 tablespoon sugar
  • 3 tablespoons unsalted melted butter
  1. Heat the oven to 275F (130c fan forced).  Put the cornflakes in a large bowl and crush them with your hands.  Seven or eight squeezes should be enough, you want crumbles, not powder.
  2. Stir together the milk powder, sugar, and salt in a small bowl.  Add the butter to the cornflakes and sprinkle the sugar mixture over them.  Toss and stir to coat the cereal evenly.
  3. Spread out the cereal on a baking sheet lined with parchment paper (or silpat) and bake for 20 minutes, or until the milk powder and sugar start to caramelize and turn a satisfying deep golden colour.  Remove from the oven and let cool.  The flakes will keep, in a sealed container at room temperature, for at least a week.

Caramelized Cornflakes

Lastly, if you are so inclined to make your own praline paste – here it is:

Praline Paste

  • 1/2 cup whole hazelnuts
  • 1/2 cup sugar
  • tiny pinch of salt
  1. Heat the oven to 400F (200 C fan forced)
  2. Spread out the hazelnut on a rimmed baking sheet and toast them in the oven for 10 to 15 minutes until they’ve warmed through and aromatic.  Remove from the oven and let cool.
  3. Put the sugar in a heavy-bottomed pot over medium-low heat.  Leave it alone and let it start to caramelize around the edges of the pan before you begin to stir it with a heatproof spatula or wooden spoon.  Patiently and attentively shepherd the sugar into a state of delicious caramelization: stir it slowly and constantly, until it’s medium amber – like the color of grade B maple syrup – and is very fluid.
  4. Put the hazelnuts into a food processor, add the caramel and salt and process for 3 to 5 minutes, scraping down the hot sweet mush from the sides of the bowl as often as necessary until it comes together into a smooth, even paste.  Store the praline in the refrigerator for weeks, if not months, until ready to use.

Cereal Milk - Momofuku

Note:  The first time I made this the gelatin did not set as I used too little gelatin for the liquid I had resulting in a big glob (though very tasty).  I was relying on the recipe which said 2 sheets (4 grams) but the resulting panna cotta  was too soft.  I was ready to start again but got some great advice from Y of Lemonpi who suggested that I could melt the glob again really gently and add more pre-soaked gelatin.   It worked beautifully!

Gelatin sheets vary a lot so to avoid this happening to you, take note of how much gelatin is needed to set the liquid, it should be written at the back of the pack. Otherwise, if you need more gelatin to set the custard, follow Y’s advice!

Read Full Post »

There are many great quotes referring to the delicious cannoli.  The two below are my favourites.

“Leave the gun, take the cannoli”… Clemenza from The Godfather.

“I’ve never had cannoli before.  But if they are supposed to taste this good, I should have had them much sooner.” – My husband’s exact words when he tried the cannoli I made for this month’s Daring Bakers Challenge…

The November 2009 Daring Bakers Challenge was chosen and hosted by Lisa Michele of Parsley, Sage, Desserts and Line Drives. She chose the Italian Pastry, Cannolo (Cannoli is plural), using the cookbooks Lidia’s Italian-American Kitchen by Lidia Matticchio Bastianich and The Sopranos Family Cookbook by Allen Rucker; recipes by Michelle Scicolone, as ingredient/direction guides. She added her own modifications/changes, so the recipe is not 100% verbatim from either book.

Leave the gun... take the cannoli - Clemenza from The Godfather

Lisa has also been kind enough to put in PDF the  Cannoli recipe.  The only change I made was to increase the amount of marsala wine (I added another 1/4 cup) and an egg until the dough was wet enough to knead.  Unfortunately my first batch was too dry so I had to start over – but it was worth it!

As for the filling, I used a combination of candied oranges and dark chocolate.

Daring Bakers Challenge: Cannoli

Grazie Lisa for a great challenge!  Your detailed instructions made a world of difference – it gave me so much confidence to tackle the challenge.

Read Full Post »

Have you ever been pleasantly surprised by a wrong first impression?

Well, when I met my husband there was no instant attraction, no sparks. Even worse – just really a total lack of interest (at least on my part). I thought he was nice but just not my type. If you told me that we would end up married I would have laughed and said “NEVER”. So how did this total apathy to him lead to us walking down the aisle? Crazy world isn’t it?

To be perfectly upfront, our love story has some uh… questionable beginnings. I was working at a large bank in their treasury department selling foreign exchange and derivatives and he was working for a large corporate and part of his job involved dealing with us.

Yes… I married my client.

We had been talking over the phone for a few weeks and then decided to finally meet up for dinner. First impression, I thought he has pretty nerdy. He was constantly talking about foreign exchange and trying to get me to exchange ideas on my views on the market. Not the type of conversation to keep me interested but I had to be polite. After all, he WAS a client.

I can confidently confirm however that he liked me. A lot. How would I know? Well, he told me so – many years later. But also at that time, actions spoke much MUCH louder than words.

Smoked Ocean Trout, Cream Cheese and Lime wrapped in Squid Ink Pasta

Thinking about it now, he was a quite clever. He knew I didn’t like him in that way so he worked on my parents instead. He asked if he could come and visit me at home and immediately won my parents over when he brought them a triple layered chocolate cake.

My Dad was over the moon to find out that he played tennis and they teed up a time to play tennis once or twice a week. I thought that he enjoyed playing tennis so early in the morning (waking up at 4:30 every morning to get to my house at 6:00) but it was only years later that I found out that he struggled to wake up so early but did it to spend time with my Dad.

My Mom was always asking why I didn’t like him when he was such a lovely young boy, of course she was asking this as she wolfed down the latest cake he brought to the house.

At work, it was no different. Everyday at 3:00 pm he would send incredibly delicious Belgian Waffles when I so badly needed a sugar fix. On Valentine’s Day I arrived at my office and there he was, with a dozen red long stemmed roses.

He was persistent and wasn’t shy to show his feelings.

I was uneasy.

I knew I didn’t like him and it was awkward because I didn’t want to upset our working relationship – which was fantastic. So I decided to be honest and admitted that I “didn’t feel the same way”. His response was something along the lines of “that’s okay – I just enjoy your company – I am not looking for anything more”.

One time he invited for dinner. I made up an excuse that I was going to see a movie with my sisters. A few days later he asked “how was the movie” – and I said “what movie?” “the one you were going to watch with your sisters” he said. “Ahh that one… yeah, well it was good!” but I am sure he knew I was lying.

Once, I had invited him to a cocktail party in some swanky hotel but at the last minute I decided I didn’t want him around so I met him at the lobby and told him that I had made a mistake and there were not enough tickets. I am sure he could see right through me but he smiled and it was not a problem. He would just see me the next day.

So we continued along the same routine for a couple of months. I am ashamed to say that I took this all for granted. He was there when I needed him but I was also willing to discard him when something “better” came up. I never took how he must have felt into account. I just thought, if he liked me so much – he would continue to hang on.

And then one day he just stopped calling.

Part 1

These canapes were inspired from Logan Campbell of Lucios Restaurant.

Recipe for Pasta

  • 150 grams flour
  • 4 egg yolks
  • 2 teaspoons squid ink
  1. Place flour onto bench top and make a well in the center of the pasta.
  2. Place the egg yolks and squid ink into the well and incorporate slowly until the dough forms
  3. Knead the pasta for 5 minutes until smooth and rest covered for 1 hour
  4. Roll out the pasta as per directions on the pasta maker
  5. Cook the pasta for around 3 to4 minutes until al dente and immediately refresh in iced water
  6. Remove the pasta and dry on tea towels before using (see below)

Note: I used 4 egg yolks (as this is what I had left over from some macaron making) resulting in a richer pasta, feel free to substitute the recipe with 200 grams flour and 2 eggs if you don’t have the egg yolks on hand

Recipe for filling:

  • 300 grams smoked ocean trout (or salmon)
  • 250 grams cream cheese
  • 4 teaspoons lime juice
  • salt and pepper to taste
  1. Mix the cream cheese, lime juice, salt and pepper in a food processor until smooth
  2. Lay some plastic wrap/cling film on a benchtop
  3. Place a sheet of pasta over the plastic wrap and lay some cream cheese over this, leaving around 2 cm free (you will need this later when rolling)
  4. Next, layer some smoked ocean trout over the cream cheese
  5. Roll the pasta starting from the end that is covered with ocean trout and cream cheese and ending in the section where there is no cream cheese
  6. Lastly, roll the pasta in the plastic wrap and refrigerate for at least 3 hours to set.
  7. Serve with ocean trout or salmon roe.

Read Full Post »

DSC_0955

Adapted from David Chang's Chicken and Egg Recipe

I had never heard of David Chang or Momofuku until two weeks ago. While browsing the New York Times I came across an article on him. I was intrigued. Ferran Adria thought he was magical. A chef of prodigious talent. Anthony Bourdain thought he was scary, smart, funny, and ambitious and the guy that all chefs had to measure themselves against these days and even Martha Stewart was a fan!

I had a sneaky suspicion that I would not be able to cook much out of his new cookbook – I had read a review that some recipes required “meat glue” – uhmm what?! But, I had to get the cookbook anyway.

I’m so glad I did.

The first recipe I laid my eyes on was his Chicken and Egg Recipe (Click here to see the original dish and recipe in all it’s beauty!). There was just something so comforting about a bowl of steaming rice topped with a slow poached egg and beautifully crisped confit of chicken. Let me warm you straight up – this is not a quick and easy meal to prepare. I am pretty sure you can get a dish that looks very similar by pan frying some chicken thighs and poaching an egg but it’s not going to taste anywhere are fantastic. This dish is truly truly inspired. If you have a few hours on a Sunday and was thinking of making a roast – try this instead. The process is not hard, just a bit time consuming – but worth it. Take my word for it. If you don’t trust me, take my husband’s word for it – he said “all chicken should be cooked this way”.

DSC_0945

Chicken and Egg

Recipe

Note: David Chang’s recipe calls for the chicken to be cold smoked. I didn’t have the cold smoker but his recipe does provide an alternative which is what I did with great results.

Serves 4

  • 8 cups lukewarm water
  • 1 cup plus 1 tablespoon sugar
  • 1 cup plus 1 teaspoon salt
  • 4 boneless chicken legs (I used 8 chicken thighs)
  • 2 strips smoky bacon (this is the alternative for those who don’t have a cold smoker – that’s me!)
  • 5 cups rendered pork or duck fat or grapeseed oil (I used grapeseed oil)
  • 2 cucumbers
  • 4 cups cooked short-grain rice
  • 4 slow poached eggs (recipe follows)
  • 1/2 cup sliced scallions (I used chives, I know – not the same but I didn’t have any on hand)
  1. Combine the water, 1 cup sugar and 1 cup salt in a large container with a lid and stir to dissolve. Add the chicken, cover or seal and refrigerate for at least 1 hour, no more than 6.
  2. Remove the chicken from the brine and discard the brine. Heat the oven to 82c and pack the chicken snugly into a pot or other oven safe vessel – the less extra space there is , the less fat is required to submerge the chicken. Tuck the smoked bacon in the dish as well. Heat the fat/oil and pour it over the chicken. Put the chicken in the oven and cook for 50 minutes (hey it’s me here – I actually cooked it for 3 hours as after 50 minutes it didn’t look all that cooked to me). Remove from the pot oven and cool to room temperature.
  3. If not using immediately, put the chicken in the refrigerator to thoroughly chill it in the fat. The chicken can be prepared through this step a week or more in advance.
  4. When you’re ready to serve the dish, heat the chicken confit in the pot in a low oven (around 80c) or on the stove top just until the fat liquefies.
  5. Remove the bones and fry the chicken (skin side only) over medium high heat until crisp.
  6. Portion the rice in four bowls and use the back of the spoon to create a shallow space in the middle and slide the slow poached egg into it. Divide the cucumber pickles among the bowl (recipe follows but I didn’t bother with this), nestling them together in a little mound. Add the chicken around the bowl and sprinkle with the scallions (or in my case, chives) and serve.
Collage

Which came first? The chicken or the egg?

Cucumber Pickle Recipe

Slice the cucumbers into coins a little less than 1/2 inch think. Toss with the remaining 1 tablespoon sugar and 1 teaspoon salt in a small bowl and allow it to sit until ready to use.

Slow Poached Egg Recipe

  1. Fill the biggest pot you can find with water (this is important because a pot of hot water is hotter at the bottom and coolest on the surface. Using a big pot ensures that the greatest volume of water at the right temperature) and put it on the stove at the lowest possible heat.
  2. Use something to keep the eggs from sitting on the bottom (I used a steam rack).
  3. Using an instead read thermometer to monitor the temperature of the water, heat the water until it reaches 60c to 62c. Let the eggs bathe for 40 to 45 minutes. Make sure that the temperature stays that that constant temperature – if it is too hot add some ice. If not enough heat, crank up the heat a little bit.
  4. You can use the eggs immediately or store them in the fridge for up to 24 hours. If you refrigerate the eggs, warm them under piping hot water for 1 minute before using.
  5. To serve the eggs, crack them one at a time into a small saucer. The thin white layer will not and should not be firm or solid; tip the dish to pour off a discard the loosest part of the white, then slide the egg onto the dish it’s destined for.

Delicious Life Blog painstakingly went through the internet to find recipes from the Ad Hoc cookbook (another keeper!). I thought it was such a great idea, I’m doing the same for Momofuku.

Fried Chicken with Octo Vin – From the Time Out New York Website

Pork Belly and Steamed Buns – From Time Out New York Website

Perfectly Prickly Cabbage Kimchi – From MSNBC

Marinated Hanger Steak Ssam – From Wall Street Journal

Ginger Scallion Noodles with Ginger Scallion Sauce – From Amazon.com (you can also order the book there!)

Other Recipes by David Chang

Chawan Mushi from Foos & Wine

Clay Pot Miso Chicken – from Gourmet

Stumble It!

Read Full Post »

DSC_0830

My take on Tetsuya's Signature Dish

From: Lopez, Trissa
Sent: Monday, 2 November 2009 3:43 PM
To: ‘XXXXXXX@tetsuyas.com
Subject: Query on Tetsuya Book

Dear Mr. Tetsuya,

So sorry to bother you – I have a book of yours and since I am not able to get a booking at your fabulous restaurant until next year, I wanted to try and recreate the Confit Ocean Trout at home. The recipe asks for konbu – but the konbu I found doesn’t look like it is for the recipe (ie a large sheet when I think the recipe requires a powder??).
I have been asking the Japanese shops close by if they know what this is but they said there is so many products that they don’t know where to begin.

Are you able to tell me what the konbu you are referring to? Is there a particular brand?

Kind regards

Trissa

I emailed Tetsuya. I really did! I know, my husband must be wanting to go into hiding right now. He thinks I have no shame. Truth is, he’s probably right!

Let me back up a little bit. For those that don’t know who/what is Tetsuya. Tetsuya is a three hat restaurant in Sydney owned by Tetsuya Wakuda. They have been consistently awarded the highest rating in Sydney’s Good Food Guide since 1992 and has been named one of the top restaurants in the world by S Pellegrino’s World’s 50 Best Restaurants.

While his accomplishments are many, he is a very humble man and so approachable. I still remember when I went there with my Mom about a year ago. Mr. Tetsuya went to our table and I introduced myself and my Mom to him. I told him that we had waited 3 months to get a table at his restaurant. He chatted with us awhile and then before he left he gave my Mom a piece of paper and said “Mrs. Lopez, this is for you so that you never have to wait three months again.” It was his business card with a “secret phone number” for special reservations! On top of that, on our way home they gave her a cookbook too!

Well, anyway, my Mom took the card with her and I was never able to use the “secret phone number”. So I had to try to get a booking like the rest of us mortals. However, every time I would call, I’d get told that the earliest available table on a weekend was three months or four months away…

So I said to myself, if I can’t get a table, I’ll just make the dish myself. Which is why I emailed Mr. Tetsuya – I wanted to recreate the most famous dish in Australia, some say, the most photographed dish in the world. It’s not hard to see why, not only does it taste delicious, it’s a really beautiful dish. Imagine a fillet of ocean trout a top a salad of fennel, barely cooked so that it still maintains it bright orangey red colour, topped with konbu shavings and a sprinkling of chives. It is surrounded by a parsley caper oil and dots of ocean trout caviar… it’s just genius!

DSC_0789

Strands of konbu

That afternoon I got a call from his personal assistant – she was kind enough to tell me that yes, it was the same konbu but they had staff that were skilled enough to cut the konbu up into tiny tiny pieces. While we were chatting I tried again, “was there a table available?” and miraculously she said yes! Did I want a lunch or dinner booking?

So that’s how I got my reservation for Tetsuya on a Saturday lunch – and that’s where the inspiration for this blog came from.

So finally, how did I deal with the konbu? Well, I bought some konbu strands (but I am sure you can use sheets to the same effect) and I ground them up with a spice grinder!

DSC_0791

Make your own konbu powder with a spice grinder!

The final result? Delicious! If I wanted to eat this dish again, there is no need for me to ask my mom for that “secret number”!

Recipe (Adapted from Tetsuya’s cookbook)

Note: The dish is so gorgeous that I initially expected it was very difficult to make. It’s not. Really. I promise. You just need a good fish monger that will fillet the fish for you…. and a spice grinder is helpful too!

DSC_0793

Trout is left to marinate in herbs, spices, garlic and a mixture of grapeseed and olive oil

Serves 4

  • 350 grams ocean trout (or use salmon if unavailable in your area), skinned and filleted
  • 100 ml grapeseed oil
  • 80 ml olive oil
  • 1/2 tablespoon ground coriander
  • 1/2 teaspoon white pepper
  • 10 whole basil leaves
  • 3 stalks thyme
  • 2 cloves garlic, crushed
  • 2 stalks celery, finely chopped
  • 2 small carrots, finely chopped
  • 3 tablespoons finely chopped chives
  • 4 tablespoons konbu, finely chopped (if you are not inclined to do so, grind them using a spice grinder)
  • 1/2 teaspoon salt
  • 2 tablespoons ocean trout caviar (or salmon caviar if unavailable)

Fennel Salad

  • 1/4 bulb fennel, shaved (use a mandolin for best results)
  • 1 teaspoon lemon juice
  • salt and pepper to taste
  • 1 tablespoon olive oil

Parsley Oil

  • leaved from 1/4 bunch italian/flat leaf parsley
  • 50 ml olive oil or grapeseed oil
  • 1/2 tablespoon salted capers, rinsed and drained
  1. Ask your fish monger to skin and cut the trout into four pieces. Each should not weigh more than 100 grams each. Marinate the ocean trout in the grapeseed oil, olive oil, ground coriander, pepper, basil leave, thyme stalks, and garlic.
  2. Cover with plastic wrap and rest in the refrigerator for a couple of hours (I left mine overnight).
  3. To cook the fish, preheat the oven to 65c and take the fish out and allow to come to room temperature.
  4. Then, lay the fish on a bed of celery and carrots and place in the oven. Paint the surface of the fish every few minutes with the oil marinade.
  5. Depending on the size of the fish, Tetsuya recommends this should take no longer than 7 or 8 minutes with the door of the oven open. I found that with the door closed, mine took 25 minutes before I was happy with the texture. The fish should remain pink but be be cooked enough that you can use a very sharp knife to cut all the way through the fish.
  6. Remove from the oven and let cool.
  7. To make the salad, slice the fennel on a mandolin (you can also use apples and daikon together). Toss with the lemon juice, salt and pepper and oil.
  8. To make the parsley oil, puree the parsley, olive oil and capers in a blender. Strain.
  9. To serve, plate some fennel salad on the base of the plate. Add the ocean trout and sprinkle with the konbu, chives and some salt.
  10. Drizzle the parsley oil around the edges and dot some ocean trout caviar around the trout and regular intervals.

DSC_0805

Stumble It!

Read Full Post »

kulinyara_v3

Kulinarya was started by a group of Filipino foodies living in Sydney, who are passionate about the Filipino culture and its colourful cuisine.

Each month we will showcase a new dish along with their family recipes. By sharing these recipes, we hope you find the same passion and love for Filipino Food as we do.

If you’re interested in joining our Kulinarya Cooking Club, please feel free to drop by our foodblogs and leave a comment – we would love to hear from you!

Trissa, Kath and Trish

DSC_0898_edited-1

Our first post: Turon!!

I’m so excited to share with you this month’s recipe for the Kulinarya Cooking Club.  But first, let me share with you a little bit about this project.  Kath, Trish and I wanted to start a blog/club that focused on Filipino cooking.  This was our way to promote the cuisine and practice our cooking skills.   Every month, we decide on a dish to feature and a date when to post – and that’s it!  We get to pick our own recipe so that we get to show you all the different ways a dish can be prepared, especially when you put your own stamp on it!

If you are Filipino (or not!) and want to further your cooking skills then drop us a line and join us on this culinary journey!

DSC_0878_edited-1

Delicious with some cold dulce de leche!

Recipe

  • Lumpia wrappers (spring roll)
  • Bananas (usually cooking bananas are used, but not imperative)
  • Sugar
  • Oil for frying

Alternative fillings to add to the bananas

  • Brown sugar
  • Chocolate and Macadamia
  • Dulce de leche
4084949920_d8a250d3ec_o

Let your imagination go wild with the fillings!

  1. Slice the bananas into a size, slightly smaller the the spring roll (also known as lumpia) wrappers.
  2. Using a pastry brush, wet the sides of the spring roll wrapper
  3. Roll the bananas in a cylinder shape and seal the edge with a little more water
  4. Deep fry at 180c for around 2 to 3 minutes until golden brown
  5. Serve immediately.

Note – it’s great with some ice cream or dulce de leche as a “dipping” sauce!

DSC_0901

Great with some dulce de leche...

Stumble It!

Read Full Post »

Family Secrets & Empanadas

Empanada "Kaliskis"

Empanada "Kaliskis"

Filipinos are funny about their secrets.  They are also notorious gossips.  So some things they divulge in a blink of the eye while other secrets they keep to their graves.

Ask a Filipino to tell you about their family history and you might hear him talk about of how an aunt of the family got pregnant at 16 with the family driver and gave birth to a child who was adopted by her mother and this child grew up as the aunt’s daughter.  Or how their best friend had a one night stand with the fiancee’s best friend  the night before the wedding and how nine months later the little bub looked strikingly similar to the now husband’s best friend.  Confusing isn’t it?  But makes for great family conversations!

In fact, Filipinos are so open about these so called “family secrets”, or most secrets in general, that my English brother in law once remarked that there are NO FILIPINO SECRET AGENTS.  For the simple fact that they would have failed the psychological portion of the exam that determines how willing you are to give up super top secrets!  Can you imagine a Filipino secret agent being dragged to a room to be interogated by a the CIA  and before they enter the room the Filipino tells the CIA “by the way, did you hear about the little atomic bomb the terrorists in the South are looking to build?”…

DSC_0149

BUT never ask a Filipino to share a family recipe.  NEVER.  They simply won’t.  These are the secrets they take with them to their grave.  These are the recipes that are passed on from one generation to another and another and yet another but will never be shared outside the confines of the family.

I remember in my university days a funny conversation I had with a schoolmate.  She had just shared with me a very sad family problem over afternoon tea.  We were having empanadas which we bought in the bakery across school.  Between sobs she mentioned that the emapanadas were similar to what her aunt made and they were a family specialty.   I asked if she could share the recipe with me and she replied that her mother swore her to secrecy.  I found it funny how she was willing to tell me about her father’s affair with her brother’s school teacher but not willing to share the empanada recipe!

See how neatly pleated they are?!  Thank you Ellie for the tips!

See how neatly pleated they are?!

The empanadas we had that afternoon were something that I have always been meaning to recreate.  They were not the typical empanadas as they were very flaky and tender and  called “kaliskis” which in Filipino refers to it looking like fish scales.  It took awhile before I found out how to make them but many years later here they are!  Luckily for me, there is a vast resource over the internet as well as great cookbooks such Andrea Nguyen’s Asian Dumplings which details the procedure of how to make this flaky pastry which I found out has Chinese origins.  Her site, Asiandumplingtips.com is an excellent resource.

The recipe for the pastry below is adapted from Andrea’s book which can be purchased on Amazon.  It is a fantastic resource and if you love dumplings (which I do in all shapes, sizes and forms!), this is a must have.

The recipe for the filling is my own.  I decided to use adobo flakes, salted red eggs and some mayonnaise as filling because I wanted to sure there was no mistake that this was a Filipino snack!

Adobo, salted eggs and mayonnaise

Adobo, salted eggs and mayonnaise

Flaky Pastry

Outer Dough

  • 125 grams flour
  • 1 1/2 teaspoons sugar
  • 1/4 teaspoon salt
  • 15 grams lard
  • 5 tablespoons warm water

Inner Dough

  • 85 grams flour
  • 85 grams lard, cut into 1/2 inch pieces

Adobo

  • 2 chicken thighs (with skin on)
  • 1/2 cup vinegar
  • 1/2 cup soy sauce
  • 4 garlic cloves, crushed
  • 2 cups water
  • 1 bay leaf
  • 4 peppercorns
  1. To make the outer dough, combine the flour, salt, sugar and lard in a food processor.  Blend until it resembles a sandy consistency.
  2. Transfer the mix to a bowl and make a well in the center and add the water one tablespoon at a time.  Use a wooden spoon to combine the ingredients.  Toss the contents to a lightly floured surface and knead for around two minutes. This should create a soft, smooth and slightly elastic dough.  Cover with plastic wrap and set aside for about 30 minutes. (note: you can add more flour if it feels too wet)
  3. For the inner dough, mix the flour and lard again in a food processor for around 10 seconds to blend the mixture.  Transfer to a bowl and mix to combine.  It should resemble soft cookie dough.
  4. Gather and pat the dough into a rough ball and place on a lightly floured work surface.  Gently pat the dough and form into a smooth ball and set aside.
  5. To encase the inner dough in the outer dough, roll the outer dough into a 16 cm circle.  Center the ball of the inner dough on top and then gently pull up and press the outer dough, pinching the ends together to completely encase the inner dough.
  6. Use a rolling pin to gently roll the dough into a square (Andrea uses an oblong shape but I didn’t read it properly at first and used a square!) about 21 cm wide and 31 cm long.  Once done, fold the dough into thirds like a letter. DSC_0004
  7. Turn the dough 90 degrees and roll out again 21cm wide by 31 cm long, and then fold into thirds like a letter.
  8. Wrap in plastic wrap and let the dough rest at least 1 hour before using.
  9. When ready to use the pastry, roll it out into a square measuring 30cm by 30cm.  Then, roll the dough from the bottom all the way to the top like a jelly roll.  DSC_0010
  10. Cut the dough into 16 equal parts and to use each part, flatten the dough with the palm of your hand to make a disc, then use a rolling pin to increase the diameter of the dough.

    Cutting the dough into equal portions

    Cutting the dough into equal portions

  11. Fill each dough portion with mayonnaise, adobo and salted red egg.
  12. Deep fry the dumplings at 180c for 5 minutes.  Drain on paper towels and serve.
  13. To use the pastry, the best resource for me was this site form Corner Cafe.  This site shows you the various techniques on how to fold and shape the pastry.

For Adobo

Mix all ingredients for adobo and simmer the chicken for 30 minutes.  Once done, remove the chicken and cool.  Once cool, shred the chicken and fry in some oil until crispy.

Special thanks to Ellie and Lorraine for teaching me to pleat!

DSC_0161

Read Full Post »

« Newer Posts - Older Posts »