Oh wow – how time flies. My poor neglected blog. It’s been nearly a year since I wrote anything and somehow I feel like I have to give you an excuse for the silence… The reality is life got in the way. New passions (Yoga! Running!), work, travel and I started trying to be healthier too. Somehow, it didn’t make sense for me to cook the same rich and heavy food I used to. I didn’t have time to make long and complicated recipes anymore… So the blog took a long break.
Sometimes people would ask me if I still updated my blog and I would always shrug it off and say “I’m too busy” but at the back of my mind, I knew I would one day revive it and maybe today’s the day? Who knows… I have good intentions and great (mostly healthy) recipes to share but I’ve also been there before where I’ve resurrected this blog with a few posts for a month or two… so let’s see. Hopefully this is a new beginning – a simple new beginning.
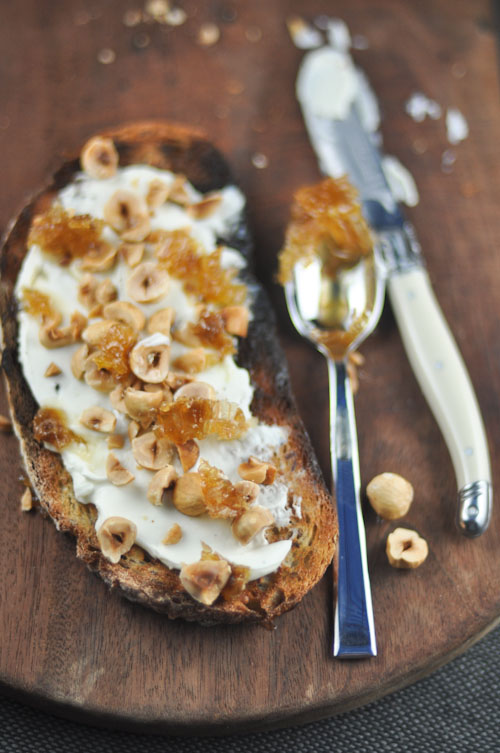
This is not so much a recipe but a guide to make pretty amazing toast. I don’t even need to write the recipe down – it’s that simple.
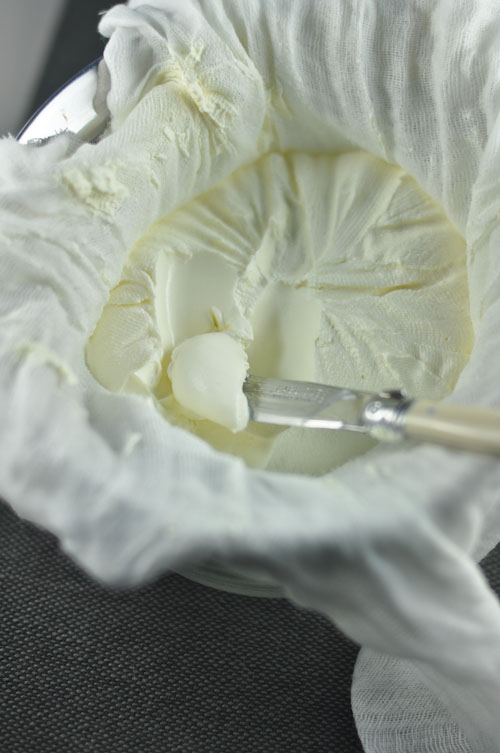
Start with some homemade labneh. Get some full cream Greek yogurt, and place it in a muslin/cheese cloth. Place the muslin over a strainer and the strainer over a bowl which will allow the whey to drain from the yogurt. Wait 24 hours before serving.
The toast some hazelnuts, in an oven at 160c for 15 minutes, and chop. Get some good quality sourdough (I used soy and linseed) and spread the labneh, then the roasted hazelnuts and finally some honey (I used honeycomb) and a pinch of salt. Bon Appetit, where I got the recipe from, also suggests some olive oil and a few turns of pepper which sounds lovely as well.
A few years ago I attended an eight week career development session with a group of very talented and ambitious ladies from work. There was a lot of coaching on how to communicate effectively and change your approach depending on who you were talking to and self-confidence building exercises (One of them was that we had to come up with a one or two liner for when we came face to face with the company’s CEO in the elevator – which never actually happened!).
In one of the final sessions we were asked to reflect on our goals and aspirations for the rest of the year and we all went around the room to share. Some of the ladies talked about aspiring for a promotion within a few months, other talked about how they had been so focussed on their career for the last few years that they wanted to make sure they also had time for their families. The lady beside me had her turn come up and she said she wanted to get healthy and lose 5 kilos… My turn was up and I said that my goal was that I would like to make a transition in to doing a different role at work, given I had been doing the same thing for a few years already.
That’s what I said…
In reality – I was thinking about how I wish my fingers were nimble enough to pleat dumplings like the har gao you could find in the dim sum restaurants. Yes, my definition of success was to be a dim sum master!
A few months later, I moved companies, and moved roles and in career terms, I’ve never looked back…
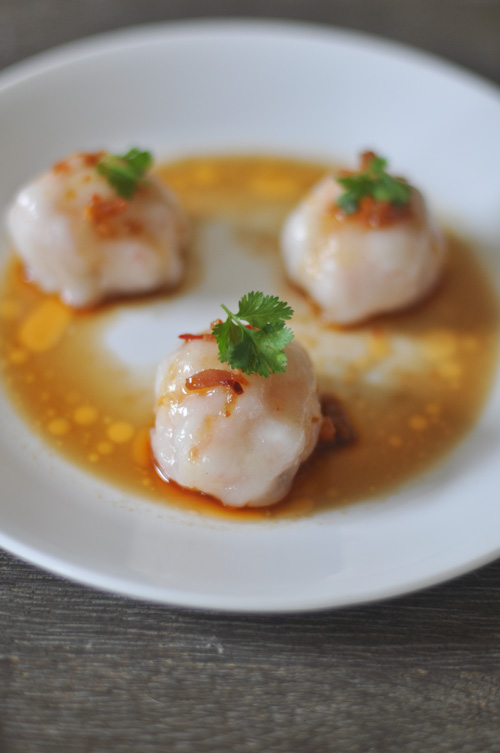
Occasionally, (like last weekend) I’ll make an attempt at perfecting the pleats – but they never turn out right. Instead, I settled for making little dumpling balls filled with prawns and scallops. The filling (yum!) more than made up for the lack of pleating skills and the dough still came out translucent and delicious.
Alas, my dream to be a dim sum master seems to be more elusive than ever.
Prawn and Scallop Dumplings
For the dough
150 grams wheat starch
85 grams tapioca flour
pinch of salt
265 ml boiling water
10 g lard or shortening
In a bowl mix the wheat starch, tapioca flour and salt together. Slowly add the boiling water and then the lard. Using a pair of chopsticks, mix the dough until you form a ball of dough. Place the dough on your work space and start to knead (careful as it will be very warm). Knead for around 10 to 15 minutes. The dough will also be quite sticky, so you can use a pasta scrapper to help remove the dough from your work surface. Cut it into four equal pieces and place these in a plastic sandwich bag to rest.
Take one of the pieces and roll it into a log around 20 cm long. Cut this into 8 equal parts place the pieces, except for the one you are going to work with back into the sandwhich bag.
Get two sheets of plastic (you can use another sandwich bag, cut in half for it, alternatively, use two pieces of baking paper) and lightly oil the bags. Put the piece of dough in the middle of the two bags (or baking paper) and press down on the dough with the palm of your hand to flatten. Then take a rolling pin and roll out the dough until around 5 cm in diameter. Alternatively, use a tortilla wrapper to flatten the dough.
Place a spoonful of the prawn and scallop mixture in the middle of the dough then pinch the ends together to seal and so you form a little dumpling ball.
For the prawn and scallop filling
150 grams raw scallops, chopped
250 grams peeled, deveined
30 grams bamboo shoots, finely chopped
1 1/2 tablespoons tapioca starch
1 egg white
2 teaspoons oyster sauce
1 teaspoon sugar
2 tablespoons spring onions, white part only, chopped
1 teaspoon sesame oil plus more for serving
XO Sauce to serve
pinch of salt and white pepper to taste
Finely chop the scallop and prawns and place in a bowl with the bamboo shoots, tapioca starch, egg white, oyster sauce, sugar, spring onions, sesame oil and salt and pepper.
Using your hands, mix the scallop and prawn mixture well and cover with some cling wrap. Allow to marinate at least an hour in the refrigerator.
Use the prawn mixture as per instructions above.
Steam the dumplings for six minutes over high heat.
Serve immediately with a mixture of XO Sauce, soy sauce, and a dash of sesame oil.
The other day my husband was raving about a cookie he had tried in a cafe. He said they were called “Nutter Butters” and they cost $5 each. $5 for a cookie?!? I was pretty surprised that someone would pay that much for one. I knew I could easily make these for a fraction of the price. I found a few recipes online, one of them actually coming from the cafe where he first tried the nutter butters – but in the end I decided to go with Thomas Keller’s recipe. Making your own cookies at home results in a nuttier, yummier and I should add – cheaper cookie. The cookies look really impressive but there is really very little effort involved in making them. The recipe was such a hit that there was a serious argument between me and my husband about how we would allocate the 8 nutter butters (i.e. how many would he eat, how many would I eat and how many we could afford to give away!)… and resulted in me making a second batch the next day.
Nutter Butter Cookies
Nutter Butter Cookies
Makes 8 large cookies, recipe from Bouchon Bakery
140 grams flour
1 teaspoon baking powder
2 teaspoons baking soda
115 grams butter, softened
80 grams peanut butter
110 grams caster sugar
95 grams brown sugar
1 egg
40 grams unsalted, roasted and chopped
100 grams quick cooking oats
Peanut Butter Icing
90 grams butter, softened
105 grams peanut butter
140 grams icing sugar
Mix the flour, baking powder and baking soda in a bowl and set aside. Pre-heat the oven to 175 c (fan forced). If conventional oven, heat the oven to 190c.
In a stand mixer, using the paddle attachment, mix the butter and peanut butter until light coloured and creamy, around 3 minutes. Add the sugars and continue to mix on medium speed for 5 minutes, scrapping down the bowl twice during the process. Add the egg and mix on medium until fully incorporated.
Now, add the flour mixture and mix on low, around 1 minute then add the nuts and oatmeal, and mix on low just until combined.
Using an ice-cream scoop, take some of the mixture place around 5 cm apart on a baking tray. Alternatively, you can use a spoon and roll the mixture into balls (using gloves makes it easier). Bake the cookies for 10 to 12 minutes until golden brown. Remove from oven and allow to cool.
In the meantime, make the filling. Mix the peanut butter, butter and icing sugar in a mixing bowl fitted with a paddle attachment. Place the mixture in a piping bag fitted with a star nozzle.
Once the cookies are cool, take one cookie and pipe some of the peanut butter icing and cover with another cookie. Continue until all cookies are filled.
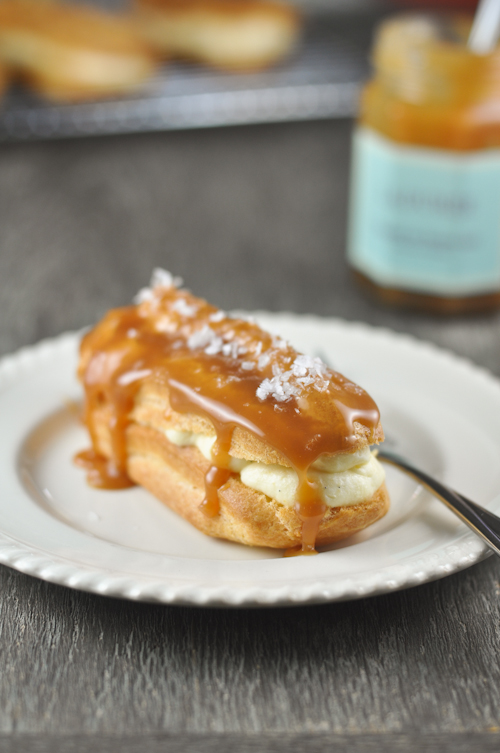
I was lucky enough to receive book called “Secrets of Eclairs” by Marianne Magnier-Moreno from my sister and have been thinking it was about time I started learning to make eclairs. She also gave me a jar of Laduree Salted Caramel sauce (I don’t know what I’ve done to deserve all these goodies!). I’ve never had a sweet tooth but the sauce was heavenly! What better way to put these two to use than by making Salted Caramel eclairs?
There are a few tricks to making the choux pastry – the ones that stand out for me (1) dry the choux pastry out (called panade) after adding the flour (2) know when to stop adding the egg to ensure pipeable consistency (3) never open the oven door while baking and (4) ensure the pastry has dried out completely before removing from the oven (I know – how can you ensure the pastry is dry when you can’t open the oven door?!?).
Let me tell you now, the recipe is not complicated to make but it does take some time so allocate half a day to make these or alternatively, you can make the choux pastry (store in an airtight container at room temperature if not using immediately) and the creme patisserie ahead of time and then assemble right before serving. Believe me, the effort is worth it!
Salted Caramel Eclairs
For the Choux Pastry (Makes about 18 to 20 pieces)
125 ml milk
125 ml water
pinch of salt
10 grams sugar
100 grams butter
150 grams flour, sifted
4 eggs, beaten (around 200 grams)
Place the milk, water, salt, sugar and butter in a saucepan and heat until the butter has melted.
Remove the pan from the heat and add the flour all at once. Stir the flour off the heat for a minute and then place the mixture back on the heat to dry out the pastry for around 5 minutes. Make sure to stir the choux mixture vigorously, over a medium heat.
Remove the choux mixture from the pan and tip it in to a stand mixer. Using the paddle attachment, beat this mixture over a medium speed and gradually add the beaten eggs, a quarter at a time and make sure the egg is fully incorporated before adding more.
When you’ve added around 3/4 of the egg mixture in, check whether the batter is ready. To do this, scoop some of the batter on to a spatula. If the mixture adheres to the spatula and then falls off, it’s just right. If it does not stick to the spatula, it’s too dry, add the egg mixture a little bit at a time until you get the right consistency. The idea is that if you pipe the mixture, it can hold it’s shape. (The first time I did this, I added all eggs in, and the mixture was too runny, the eclairs didn’t rise)
Pre-heat the oven to 180 c
Place the choux pastry in a piping bag fitted with a star nozzle that is 1.5cm thick and put in the refrigerator to allow to cool slightly.
In the meantime, get some baking paper and you’re ready to create guides which will help you as you pipe the mixture. Using a ruler and a marker, draw rectangles that are 10 cm long and 2.5 cm wide, spaced around 4 cm apart. Place another sheet of baking paper over the guide.
Take the mixture from the refrigerator and carefully pipe on to the baking paper, using the marked baking paper as a guide.
Lightly spray some water over the piped choux pastry and place in the oven. Bake for 20 minutes and then lower the heat to 150 and bake another 20 minutes. Once done, turn off the oven and leave the pastry in, another 5 minutes. (Never open the oven door while baking the eclairs as this will cause it to deflate) Remove the pastry from the oven.
When the pastry has cooled, use a serrated knife to cut along the tops of the pastry and fill with the creme patisserie (recipe below)
Creme Patisserie
300 ml milk
1 teaspoon vanilla extract
100 grams sugar
90 grams cornstarch
1 egg yolk
80 ml milk
100 grams butter
500 to 600 ml thickened cream
Salted Caramel sauce to finish the eclairs
Heat the 300 ml of milk over a low heat. Add the vanilla.
In a bowl, combine the sugar, cornstarch and egg yolk. Mix thoroughly then add the 80 ml of milk. Add this mixture to the 300 ml of milk and allow to thicken, using a whisk to stir the mixture. When the mixture has boiled, quickly take it out of the heat and place in a stand mixer. Allow the mixture to cool around 5 minutes. Using a whisk attachment, gradually add the butter until it is fully incorporated. Place the custard in a bowl and cover with clingfilm. Place in the refrigerator for around an hour.
When the custard has cooled, take it out of the refrigerator and give it a good mix to loosen it slightly. Weigh the custard mixture. Let’s say the mixture weighs around 550 grams, take the same amount of cream and whisk it using a stand attachment to stiff peaks. Before adding the cream, add around 50 grams of the salted caramel sauce to the custard. Then, add 1/3 of the cream to the custard until well combined then carefully fold in the rest of the cream to lighten the mixture.
Place the creme patisserie on to a piping bag fitted with a very small round tipped nozzle (about 6mm). Make three holes on the bottom of the eclair and pipe the cream patisserie filling.
To finish the eclairs, spread some salted caramel over the eclairs and top with some sea salt flakes. Salted Caramel sauce can be bought or otherwise, you can use the recipe here (just skip step 7).
I used to work with a guy whose name I couldn’t pronounce. For months, I managed to avoid calling him by his first name until one day I was in a teleconference call and someone suggested that I introduce everyone. So around I went, introducing each one of them until I reached “Paraic” and I was like “uhm, how do you pronounce your name again?” Turns out it was an Irish name and pronounced something like “Pho-rac” (to date, I’m still not 100% sure).
I told my other officemate about it and he said he also didn’t know how to pronounce his name. In fact, for months he used to refer to Paraic as “the finance guy”.
The other name I can never get my head around is the guy from River Cottage. As much as I love that show, I always call him “Hugh something-something”. This evening I tested my husband (who claims he is also a massive fan of the show).
“What’s the name of the guy from River Cottage?” I asked him.
“Google it.” He said.
“No, just tell me!” I said.
“Hugh Whitley?… or Whitely? … or Fernley?” He guessed.
I burst out laughing. Turns out he was just as bad as I was.
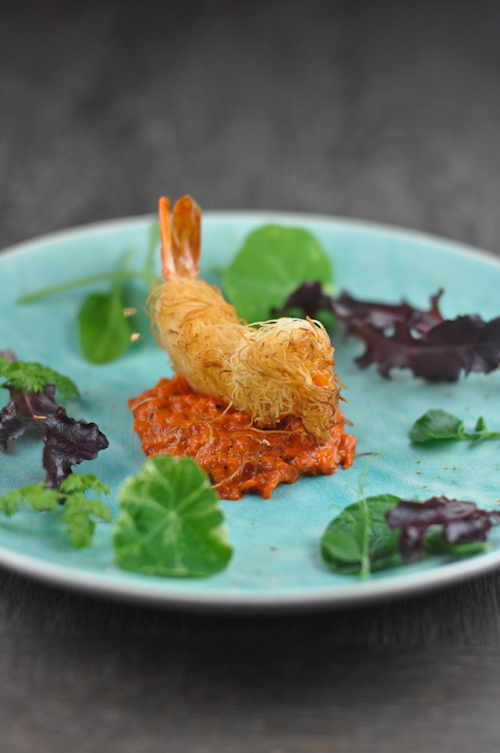
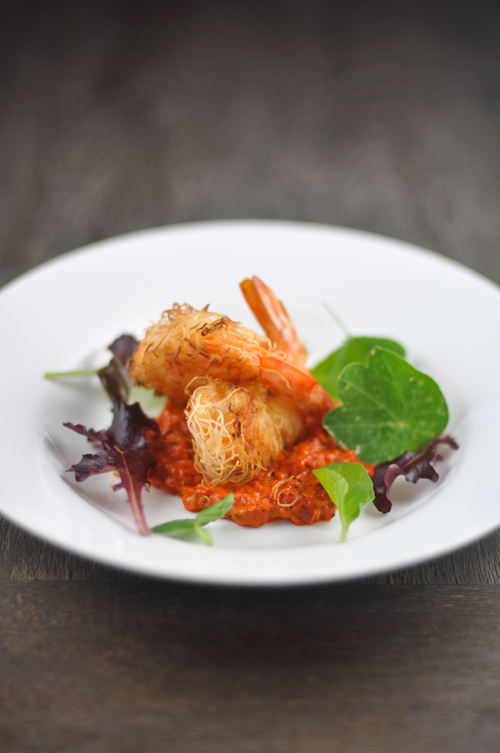
This is one of those recipes where I am totally unsure of how to pronounce the ingredients. Kataifi? Ajvar? Don’t even ask me to try. All I know is that the combination is delicious! The inspiration was from a dinner I had a few weeks ago at Efendy in Balmain. The Ajvar is a Serbian relish made with roasted capsicums, roasted eggplants and some chili. It’s a delicious accompaniment to the prawns and it’s also amazing with fresh sourdough bread topped with goat’s cheese.
The herbs come from my newly planted edible balcony, but more on that another time.
Oh, and for the record – the River Cottage guy? His name is Hugh Fearnley-Whittingstall
Prawn Kataifi
Prawn Kataifi with Ajvar Sauce
Serves 6
12 large prawns, peeled and deveined
100 grams kataifi pastry, at room temperature for at least 30 minutes
50 grams butter, melted
zest of one orange or mandarin and 1 tablespoon of it’s juice
Ajvar sauce (I used Mama’s Brand) to serve
Pre-heat the oven to 210c. Mix the orange/mandarin zest and juice with the melted butter and pour over the kataifi pastry.
Line a tray with foil and spray with some olive oil.
Carefully spread around 2 tablespoons of the pastry on a wooden board and place a prawn on one side of the pastry and roll the pastry over the prawn to cover.
Lay the prawn carefully on the lined tray and repeat with the remaining prawns.
Place the prawns in the oven and bake for around 15 minutes, turning halfway until the prawns are golden.
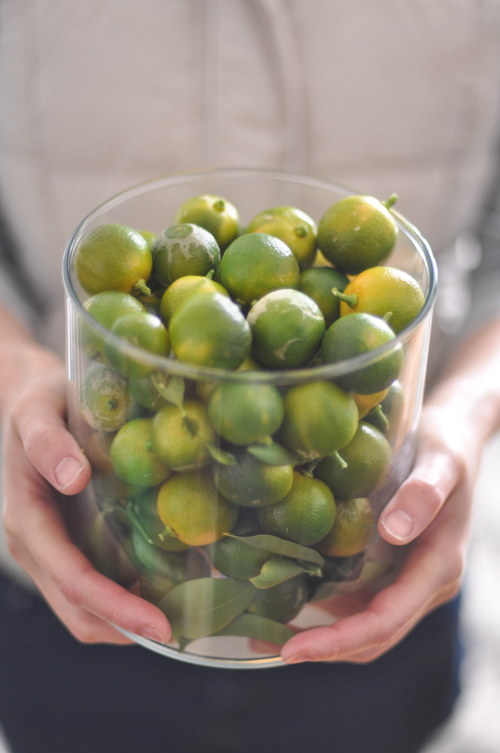
A few years ago I planted a little calamansi fruit tree in our balcony… and then I waited… and waited… and waited some more. My tree never seemed to bear much fruit. If I was lucky, I would get three or four calamansi and I was ready to give up – the tree was taking up space but not giving me much to work with. I was ready to uproot the tree and plant something else.
A few months ago I noticed a few calamansi budding from the branches and so I waited a little bit more (after all, what was another month after waiting all those years) and suddenly the fruit just kept coming and wouldn’t stop! I managed to collect over 3 large bowls of the fruit, much more than I would immediately need so I juiced them and froze them in little ice cubes to be used in the future.
For those who are unfamiliar with calamansi, they are a native citrus very common in the Philippines. When I lived in the PHilippines I used to enjoy an ice cold glass of calamansi juice (sweetened with a little sugar or honey). I’ve also seen some people use it in desserts like a calamansi curd for macarons. Me? I prefer to use it as part of a “sawsawan” or dipping sauce. Usually the “sawsawan” will be some sort of combination of fish sauce, soy or vinegar which we then use to flavour our dishes. Think deep fried crispy piece of fish served with a dipping sauce of calamansi and fish sauce… or pork belly grilled over charcoal and served with soy, vinegar and garlic. Now you get the idea!
The recipe below is as simple as it gets. I’ve used the juice of the calamansi in a “Kinilaw” which the Philippine’s version of a ceviche. The dish is served a “pulutan” (which means to “pick up”) or appetizer and is usually made with fresh fish (I like to use snapper). For this recipe I’ve made it with some mussels which I’ve cooked first and then doused in the kinilaw marinade right before serving.
Calamansi
Mussel Kinilaw
1 kilo mussels, cleaned and debearded
1 long red pepper
1 long green pepper
1 shallot, finely chopped
1 cm ginger, finely grated
1/2 red onion, thinly sliced
1 garlic gloved, crushed
3 tablespoons coconut milk or coconut cream
2 tablespoons coconut vinegar or cane vinegar (any Filipino brand will do)
2 tablespoons calamansi juice
salt to taste
Place the mussels in a pan and a splash of water. Gently heat until the mussels are cooked (careful not to overcook them)
Once the mussels are cool enough to handle, remove them from their shells and place in the refrigerator until they are cold.
Mix the rest of the ingredients together and pour over the mussels right before serving.
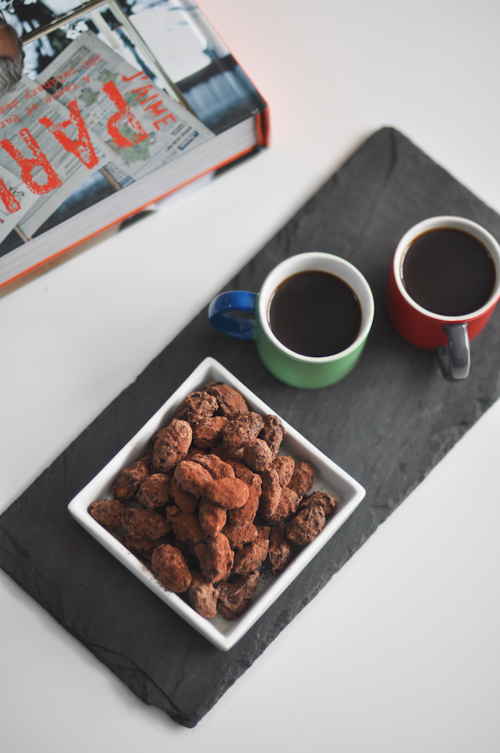
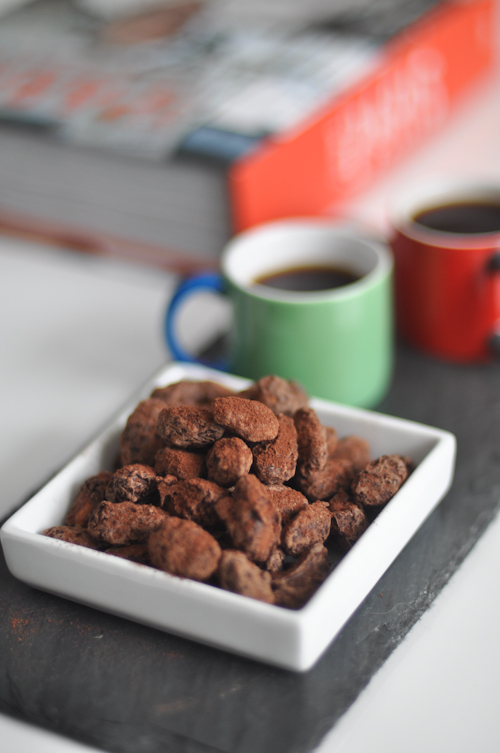
I have never understood the art of tempering chocolate. It’s one of those things that has been explained to me, that I’ve read up on, watched videos etc but I still don’t understand the science behind it. When someone starts to clarify the process, I can feel my eyes glaze over and even if I nod my head and say all the right things (i.e. “ah so that’s why!” “oh, now I get it!”), I’m still as confused as ever.
One thing I do know, is that if you don’t temper chocolate, you don’t get that beautiful shine and nice crisp…. which is why I love this recipe, because you can cover up the fact that you don’t know how to temper chocolate properly and still make something pretty damn impressive!
I like to serve these chocolates with coffee or tea. I usually coat them in cocoa powder but have also coated them previously in a combination of cocoa and orange zest.
Chocolate Covered Almonds
Chocolate Covered Almonds
50 grams water
150 grams sugar
500 grams blanched almonds
25 grams butter
350 grams dark good quality chocolate, chopped evenly
Lightly oil your kitchen bench top with a neutral oil like grapeseed.
Place the water and sugar in a heavy based saucepan. Heat until 110c then add the almonds and coat with the syrup.
Take the almonds off the heat and stir vigorously so as to separate the almonds into pieces. Then, place the almonds back on to the heat and continue to stir over a low heat until the almonds are caramelized, around 15 minutes
To test if the almonds are done, take a piece and cut in the middle and see whether the inside of the almond is a nice golden colour.
When done, add the butter and stir through the almonds. Remove from the heat and place on your kitchen bench top. Using two forks, separate the pieces of almonds carefully so they don’t stick to each other.
Allow the almonds to cool then proceed to coating with chocolate.
First temper the chocolate. Take around 2/3 of the chocolate pieces and place in the microwave. Heat in 20 second intervals until the chocolate has almost all melted, making sure to stir the mixture every now and then (especially if your microwave heats unevenly) and then add the rest of the chocolate and let the heat from the chocolate melt the remaining chocolate, and ensuring to stir constantly.
Once the chocolate has reached around 31c, pour 1/3 of the chocolate in to the almonds and stir vigorously again, with the goal of separating the almonds into pieces (try not to have too many clusters of chocolate almonds).
Place the bowl in the fridge and allow to cool for 5 minutes. Now, add another 1/3 of the chocolate (if it gets cool, you can again microwave for around 10 seconds or so before adding this to the refrigerated almonds.
Once again, mix the chocolate vigorously, aiming to keep the almonds separated. Place the almonds back in the fridge for another 5 minutes.
For the last time, pour the remaining chocolate and stir to keep the almonds apart. Place the almonds in the fridge to set for 5 minutes.
If the almonds have stuck together, carefully separate them.
My sister once asked me to babysit her son, my two year old nephew. Somehow, I had this impression that she would only be gone a few minutes, 30 at most, little did I know that she would take advantage of that window of freedom and was gone for over two hours.
The first half hour was easy – I sat him infront of the computer and we spent the time watching Mickey Mouse Club House. After awhile he started asking for his Mum (I was secretly wishing she was around too!)… I was in a bit of a dilemma as I wanted to start with my homemade pasta but I also had to babysit. So I asked him if he wanted to help me make some pasta, expecting that this would pre-occupy him for at least a few minutes. I couldn’t have been more wrong!
My two year old nephew was a natural! In fact, I was so impressed that I took a video of him working with the dough, laminating it through the pasta machine, flouring the sheets and so on. We ended up spending a good hour making the pasta and I was so sure that it would turn out perfectly and that no one would believe that he had made it all by himself (with some supervision of course)… so I decided to video the experience. Just in case he gets to be a rockstar chef one day, I’ll have proof that I gave him his first pasta making lesson.
If you’d like to watch him, the clip is below. Apologies for the lousy editing – I clearly cook better than I do make a video!
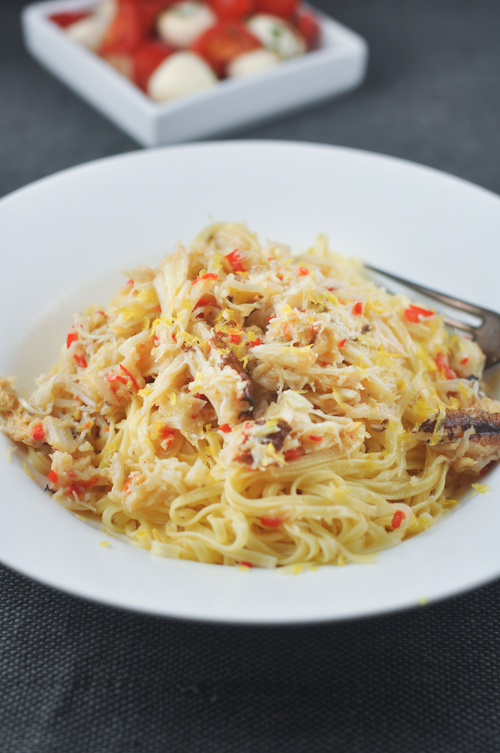
Anyway, the recipe I’m sharing today is one where fresh angel hair pasta is best used. A few weeks ago we took a friend to the Hunter Valley and had lunch at one of the restaurants there, Roberts. This was my by far my favourite dish and the fact that I didn’t order it (I only managed a taste from my husband), meant that I had to try and copy it at home. I’ve always known that crab, garlic and chilli go well together, but the addition of lemon zest was a brilliant idea!
Angel Hair Pasta with Crab, Chilli and Lemon
serves 2
50 ml olive oil
30 grams butter
2 large red chillis (leave the seeds and pith on for a spicier sauce)
4 cloves of garlic, crushed
250 grams fresh crab meat
200 grams fresh angel hair pasta
Zest of one lemon
salt to taste
Fill a large pot with water and bring to a boil. Cook the pasta, if using fresh, around 1 minute, if dry, follow package instructions.
Heat the olive oil and butter in a sauce pan. Add the chillis and garlic and saute for a few minutes over a low heat until fragrant, around 3 to 4 minutes.
Add the crab meat and lemon zest. Season to taste and toss in the pasta. If the pasta seems a bit dry, add some of the pasta water to the sauce (around 50 to 100 ml)
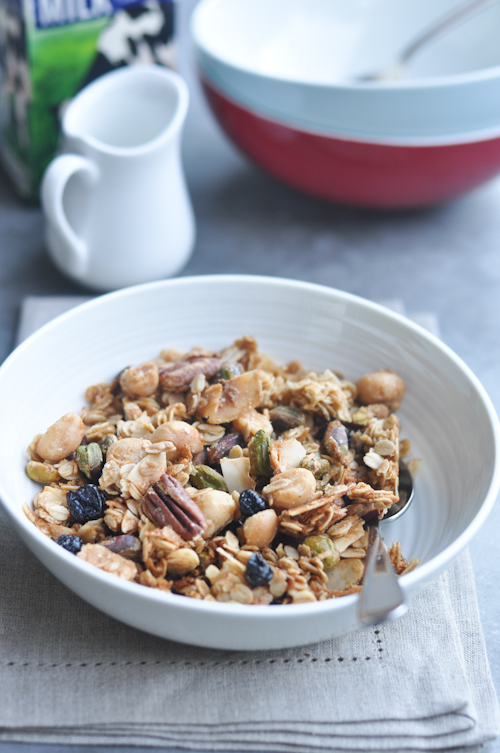
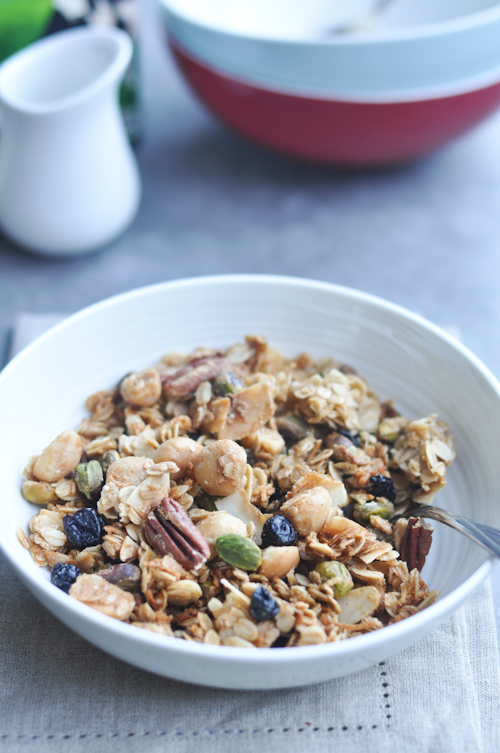
There’s a granola movement happening in our family nowadays – we can’t get enough of it. It started innocently enough. I had been wanting to try the granola recipe from Daniel Humm’s Eleven Madison restaurant ever since I saw an interview where he said that he loved to run every morning and made his own granola. He thought it was a great idea to give a jar of granola to each person who dined at his restaurant. Apparently, his granola is legendary. I think… mine is better. I know it’s a big and bold statement but the beauty of this recipe is that you can adapt it to your taste.
The way I look at it, the basic recipe is made up of rolled oats, brown sugar, maple syrup and olive oil – from there you’re free to add whatever else you like. The original recipe calls for pepitas and dried sour cherries. I substituted macadamias and dried blueberries instead. My husband prefers his with almonds and pecans. My sister adds dried mangoes… See? I told you there was a granola movement in the family! Everyone has their own recipe which they claim is the best version. We can’t agree on which version is best. We can’t even agree on when and how to eat it. I like it for breakfast with milk. My sister likes it as a snack with yogurt. Her husband takes his with skim milk and my husband treats it more like a snack.
I’m sure as a family which version, when to eat it and what to eat the granola with will be one of those things that we will never come to terms with. But I’d still encourage you to try this recipe (or a version of it) and share it with your families as well.
Best Ever Granola
Best Ever Granola
Adapted from Daniel Humm, Eleven Madison
2 1/2 cups rolled oats
1 cup dried coconut chips (or dried shredded coconut)
1 cup raw macadamias
1 cup pistachios
1/2 cup brown sugar
1/3 cup maple syrup
1/3 cup extra virgin olive oil
1 teaspoon salt
3/4 cup dried blueberries
Note: For the macadamias and pistachios – feel free to substitute nuts of your choice (i.e. almonds, pecans, pepitas etc)
Note: For the dried blueberries – feel free to substitute dried fruit of your choice
Mix the rolled oats, coconut chips and nuts in a large bowl.
In a saucepan, heat the brown sugar, maple syrup and olive oil until the sugar has melted, around 2 to 3 minutes.
Remove the brown sugar/maple syrup from the heat and add the salt. Pour this over the rolled oats mixture and mix until well combined.
Line a baking sheet with parchment paper and spread the granola over it. Bake in a pre-heated 150c oven for 30 to 40 minutes until golden and the mixture has dried. Stir the granola once or twice while baking.
When done baking, add the dried blueberries. Allow to cool and store.
My two sisters are great cooks and while I love to cook for everyone in the family, once in awhile I like to sit back and enjoy their great food. This weekend the family celebrated Easter lunch at my place and I asked my eldest sister to make her Leche Flan. This dessert is the Filipino version of creme caramel. I’ve always thought a great leche flan/creme caramel is very intimidating to make. I prefer one that has a very smooth texture and a dark, almost bitter, caramel sauce. My sister however thinks it’s the easiest dessert to make and hers comes out perfectly every time. The recipe was passed down from my Grandmother and it takes less than ten minutes to put everything together and around 40 minutes to cook. Very minimal effort for an impressive dessert.
Leche Flan (Filipino Style Creme Caramel)
1 cup sugar
375 ml evaporated milk
3/4 cup sugar (additional)
5 egg yolks plus 1 egg
1 teaspoon vanilla beans
Boil the sugar in the sauce pan until dark brown and pour in a 23 cm metal cake pan and allow to harden.
In a sauce pan, combine the evaporated milk, 3/4 cups sugar, vanilla beans and eggs, whisk lightly. Place over a gentle heat and mix gently for a few seconds (you don’t want the eggs to cook). Pour the milk and egg mixture into the cake pan. Cover with foil.
Steam the flan over slow heat for 40 to 45 minutes until the flan is set.
Allow the flan to cool. Refrigerate the flan for a few hours. When ready to serve, run a knife around the sides of the cake pan. Place a large serving plate over the cake pan and flip over. Pour the extra caramel over the flan.